Wednesday, June 23, 2021

Sending Blooms Your Way

 I recently received this adorable free stamp from Honeybee Stamps for making a $75.00 dollar purchase.  It was so cute, I wanted to create a  card using it.  


I used the Honeybee Summer Stems paper pack for the background, envelope flap, and to frame the image.  It was stamped onto Xpress it cardstock and colored with my copic markers.  It was then cut out using my stitched squares dies and placed onto the card.  I stamped the sentiment in black and cut it out with two fish tales on the ends.  It was adhered to the front of the card.  


I LOVE Honeybee products and I am sure you will too.  And with free gifts like this, you can't go wrong.

Thanks for stopping by and "Keep On Crafting!"


Jeanne

Tuesday, June 22, 2021

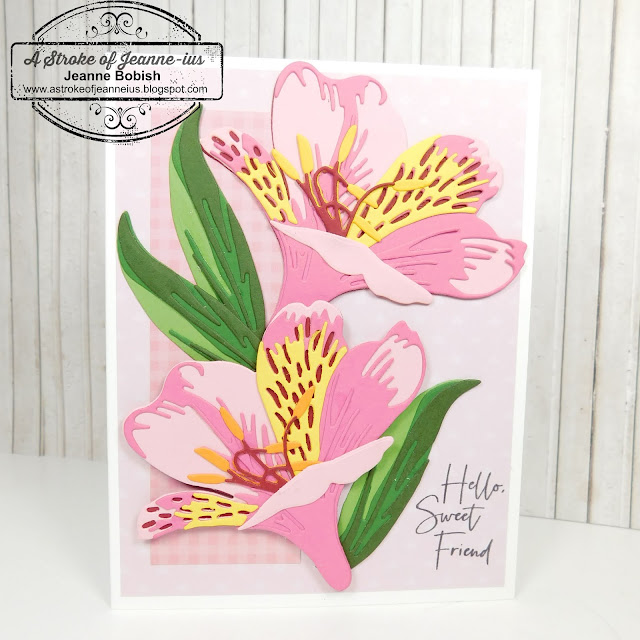
Peruvian Lily card

 Today I am featuring this lovely friendship card.  It features two beautiful pink Peruvian Lillies from Altenew's `Craft A  Flower Club for June 2021.  You can purchase this layering die set either separately, or you can subscribe to the monthly club and get a new layering flower every month.  


To create this card, I started with a white card base, then I removed the soft pink/checked paper from the Blue Blossom Double Sided Paper pack.  I created a mat of the soft pink side of the paper measuring 4 x 5.25".  I then cut a strip of the checked side of the paper.  I accidently mis-cut this piece, but decided to use it anyway and placed it along the left side of the front of the card.  

The lilies were created with several shades of pink cardstock along with yellow and a soft orange for the stamens.  There is a guide on the back of the die package showing how the pieces should be layered.  I cut three leaves using three different shades of green cardstock.  

The leaves and top lily were glued down. The bottom lily was popped up using foam squares.  I found the perfect sized sentiment to fit in the lower right corner.  It comes from the Spellbinders Clear Stamp of the Month Kit for May 2021.  This set can be purchased without a subscription  here.  

I decided to decorate the flap of the envelope, by covering it with the pink plaid paper that matched the strip on the card.  I really like doing this whenever I can, as it adds a little extra touch to the set.  


I really liked how this one turned out.  Of course, I love anything pink!  I hope you too will give these lilies a try.  I am sure you too will love them!  

Thanks for stopping by and "Keep on Crafting"

Jeanne
Sunday, June 20, 2021

Two Masculine Themed Cards Using Spellbinders Dies of the Month

 I have been a member of the Spellbinders die of the month club since it began.  I recently decided to get the large dies also. When you purchase both, you get a  discount called the die hard club.    This post will feature two cards, one from each die set.  (They also have many other clubs to choose from)


The card on the left features the Large Die of the Month for July, called Colorblock Circles and Stripes.  I have used  shades of light and dark lavender cardstock to create the striped design  and the circles.  I used blue cardstock for the curved die and the mat and then added the happy birthday using black cardstock.  I did use a corner rounder on the top piece.  Here is the finished card.  


The second card uses the small die of the month for July, called Colorblock Landscape.  I wanted to give it a desert look, so I chose tans and brown cardstock for the ground and mountains.  The sun was cut from a dark coral cardstock.  The sun rays were cut from a pale yellow and ink blended using Citrus Cooler then I added some Rich Coral ink overtop and blended using a foam dauber. I arranged the rays around the sun and then pieced together the bottom section.  I added the cacti in green cardstock and the sentiment was from my stash and stamped onto some white cardstock and popped up with foam squares. 

Here is the finished card:


 I think that either card would work for the men in your life.  We seem to really struggle with masculine cards.  You can easily change the colors of cardstock used for a completely different look.  


Thank you for stopping by and "Keep Crafting"

Jeanne

Friday, June 4, 2021

Stitched Card Front Border and Flower Die Set

This card features Spellbinders Large Die of the Month for May 2021.  It is called the Stitched Card Front Border and Flower.  If you like to embroider, this just might be for you!


I started by selecting a pretty blue cardstock that coordinated with the embroidery thread I hand on hand.  I first cut out the boarder die along the bottom of the blue paper.  Using white embroidery thread, I stitched out the border.  To separate it from the rest of the card, I added some thin dark blue ribbon and tied a bow which was then glued to the ribbon on the left side.  I added light blue pearls to the center of each flower along the bottom border.

For each flower and leave, I die cut two pieces of each out of white cardstock and glued them togeter.  This added some stability to the flowers and leaves.  I then embroidered the leaves with green thread, and two flowers in light blue, and one flower in dark blue thread.  The centers of the flowers were done in yellow thread.


For the sentiment, I chose Gina K designs, scripty sayings and embossed it with white embossing powder. I love this stamp set and found that it fit perfectly in the space provided.  

I hope you like this card.  It is a little different with the embroidery, and a little time consuming to do all that embroidery, but I think the end result is well worth it.  

Thanks for stopping by!

Jeanne

Thursday, June 3, 2021

Pretty Floral and Madras Hello Card

 Like I said yesterday, I am in love with Memory Box's new Madras Plaid Blue and Violet paper pad. I decided to use another pretty sheet of this paper to create  a different type of card.  I am using the Spellbinders Floral Oval die set, which I believe is discontinued, but you can still purchase it on Amazon, by clicking here.  Here is a photo of what I have created.  


I started with a white base card and cut the mesh oval also from white cardstock.  I then found a beautiful blue cardstock in my stash that complimented the madras perfectly.  I cut one piece at 4 x 5.25" and centered it on the base card.  I cut the plaid cardstock to 3.75 x 5".  I then used the mesh oval die to cut a piece out of the plaid paper.  I set this piece aside and centered the remaining plaid paper on the blue.  Taking the white mesh piece I cut earlier, I placed it in the oval cut from the plaid paper so that the blue showed thru.  I cut the vine piece using a green cardstock.  The flowers were then cut and assembled using the same blue paper from my stash.  I added some of light blue pearls to the center of each flower.  

The sentiment was cut from white cardstock using the Dare 2B Artsy "Hello" mini die.  It was glued to a rectangle of the blue cardstock and adhered to the front of the card.  


To complete this project, I added a strip of the same madras cardstock to the envelope.  I feel this makes them more coordinated and looks more professional.  


I hope you enjoyed this card.  I love the color combinations and will surely be using more of the madras paper in the future.  


Thanks for stopping by and keep on crafting!

Jeanne

Wednesday, June 2, 2021

Fun and Easy Masculine Birthday cards

For those of you who struggle with making masculine cards, I may have a fun and easy solution for you here today.   I was thinking of Father's day coming up, and I went thru my dies that I have for that holiday and came across this adorable die set from Sunny Studios called Sweater Vest.  Here are two different versions:


I recently purchased a 6x6 paper pack from Memory Box called Madras Plaid Blue and Violet.  These  papers were so pretty, I decided to use them for the sweater vests.  The first one, I chose a teal colored paper from my stash to accent the plaid.  The bow tie, collar and bottom band were all cut using the teal paper.  The collar and portion of shirt that shows above the sweater collar were both cut with white cardestock. For the sentiment, I used an older FSJ die set from my stash in the coordinating teal color.


For the next card, I choose a lavender colored cardstock to coordinate with the madras paper I chose.  This time I used the V neck sweater collar.  The shirt and collar were done the same as the above card.  The Simon Says Happy Birthday Die was used to create the sentiment with the lavender cardstock on the second card.  


Both "sweaters" were adhered to an A2 white card base on which they fit perfectly.  I decided to add a piece of each of the madras papers to the envelope flaps so they looked more coordinated.  

Now these were made into birthday cards, however they can still be used for Father's Day or any other time you want a more masculine card.  I hope you like them and this helps with some of the masculine card struggles.

Thanks for stopping by!

Jeanne