Friday, January 28, 2022

Slimline Borders card from Classically Becca Collection

 Today I am featuring another beautiful card from the Classically Becca Collection.  This one used the Romantic Slimline Borders die set and the Cinch and Go Blossoms die set.  


To create this lovely card, I started with a white A2  card base.  I then chose four different shades of blue cardstock and cut each one using the same boarder die from the Spellbinders Romantic Slimline Border Die Set using my Platinum 6 die cutting machine.  These were then layered as shown and glued in place using Bearly Art Liquid Glue.  

Once dry, I foiled a piece of white cardstock using Cobalt Blue Foil from Spellbinders and the Essential Glimmer Sentiments hot foil plates also from Spellbinders.  I chose the "Just A Note" plate and foiled it using the Glimmer Hot foil machine.  It was then glued across the center of the card using Easy Glide Permanent Tape Runner.  I then trimmed the borders and sentiment strips using my detail pro shears.  


You know me and my flowers, so I had to add some to the left front of the sentiment strip.  I used some white, light blue, pink and soft yellow cardstock and the Cinch & Go Blossoms also from the Classically Becca Collection from Spellbinders using my Platinum 6 machine.  They were shaped using the Sizzix flower shaper kit and glued to the front of the card as shown using the liquid glue.  Finally I found some blue enamel dots from my stash to add to the center of each flower.  


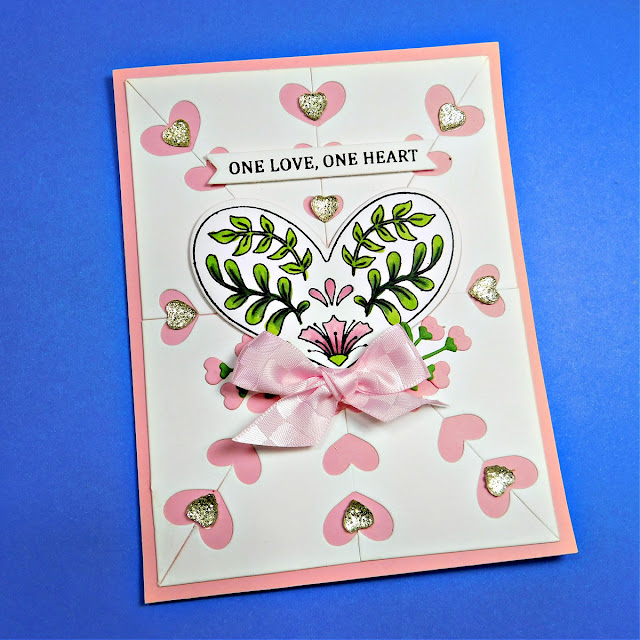
Again, here is a photo of the finished card.  


I love how this card turned out.  Feel free to make it any color you want or have various shades of.  I bet it would look wonderful in different colors, or even a rainbow effect!

If  you click on SOME of the links in the blog or purchase from any of the vendors on the left side of each post,  please use my link (just click on the image for the store you want to use).  It will not affect your purchase in any way, but will provide me with a very small compensation for your order.  Some are affiliate links, some are not.  This is what helps me to be able to purchase new products to share with you!  Thank you!  It is very much appreciated.  

Thanks for stopping by and have an amazing day!

Jeanne
A Stroke of Jeanne-ius

Never Stop Creating


Friday, January 21, 2022

With Love Slimline Card from the Classically Becca Collection

 I don't normally make slimline cards, but todayI decided to do just that.  I will be using the With Love Regalia Card Builder from the Spellbinder's Classically Becca Collection which is now available.  


This particular card was created by starting with a slimline base card.  I cut a white base card using my paper trimmer so that the card front would measure 8.5 x 3.5.  I then did the same with a piece of pale yellow cardstock. Which was attached to the front of the card using Easy Glide permanent adhesive tape runner

Once that was done, I cut out the filigree pieces and the center piece with white cardstock using my platinum 6 machine.  This was then adhered to the front of the card using Bearly Art Liquid Glue.  Once that was dry I cut the "With Love" sentiment from Brushed Gold cardstock and adhered it to the center panel and then added both to the card front as shown. 


Then for a finishing touch I cut out several of the flowers in the set from soft blue and the same pale yellow cardstock along with the vines and leaves from green cardstock.  Once cut out, they were then assembled and attached to the card as shown above. 

I think this card turned  out very pretty with the soft spring-like colors.  You could also do it in reds or pinks for valentines day.  Why don't you give it a try?

If  you click on SOME of the links in the blog or purchase from any of the vendors on the left side of each post,  please use my link (just click on the image for the store you want to use).  It will not affect your purchase in any way, but will provide me with a very small compensation for your order.  Some are affiliate links, some are not.  This is what helps me to be able to purchase new products to share with you!  Thank you!  It is very much appreciated.  

Thanks for stopping by and have an amazing day!

Jeanne
A Stroke of Jeanne-ius

Never Stop Creating


Wednesday, January 19, 2022

Classically Becca Collection - Valentine Card

 Today I am creating a Valentine's card using two of the dies from the Classically Becca collection from Spellbinders.  If you love Amazing Paper Grace and any thing by Becca, you will love this collection!


I just LOVE this card!  I started with an A2 white card base. Then I cut a piece of red cardstock to measure 4 x 5.25 using my paper trimmer.  It was adhered to the base card using my Easy Glide Permanent Adhesive Tape Runner.   I then die cut the filigree section and the sentiment using Brushed Gold cardstock and the new With Love Regalia Card Builder dies from the new Classically Becca Collection Using the Platinum 6 die cutting machine.  It was then adhered to the front of the card as shown using Bearly Art liquid glue.  

I had a pink cardstock heart left over from a project I created using the Heart Stamp and Die set which was the clear stamp and die set of the month from Jan 22.  This was also adhered above the filigree section and the sentiment was glued on top of the heart.  Both were adhered using the Bearly Art liquid glue.  

Next I decided it needed some flowers, so I created 5 flowers, 1 large and 4 small using white cardstock and the Cinch and Go Blossoms die set, also from the Classically Becca collection  using thePlatinum 6 die cutting machine.  I cut the centers of each flower with a soft yellow color, shaped them using the Sizzix Paper Shaping set, and assembled them using Bearly art Liquid glue.  I added a fashion gold embellishment to the center of each flower and adhered them along the edge of the filigree piece using glue dots.  Finally I added a red bow with ribbon from my stash just underneath the larges flower for a finishing touch.  The ribbon was cut using my detail pro shears.  


And that's the finished card!  As I said before, I love this card and think it would be perfect for Valentine's Day.  

If  you click on SOME of the links in the blog or purchase from any of the vendors on the left side of each post,  please use my link (just click on the image for the store you want to use).  It will not affect your purchase in any way, but will provide me with a very small compensation for your order.  Some are affiliate links, some are not.  This is what helps me to be able to purchase new products to share with you!  Thank you!  It is very much appreciated.  

Thanks for stopping by and have an amazing day!

Jeanne
A Stroke of Jeanne-ius

Never Stop Creating


Tuesday, January 18, 2022

Glimmering Hot Foil on Glitter Paper

 Today I was playing around with my Glimmer Hot Foil System and wondering if I could Hot Foil on glitter paper.  I gave it a try with Gold Foil and Red Glitter paper from my stash and lo and behold, it worked beautifully.  So using the new collection from Spellbinders, I decided to use one of the new glimmer plates from Yana's Blooms Collection and created this card.  


To begin, I started with an A2 white base card to which I added some mirror gold cardstock, cut to 4.0 x 5.25 inches using my paper trimmer.  This was then centered and attached to the center front of the base card using my Easy Glide Permanent Tape Runner.  Next, I cut a piece of dark red cardstock to measure 3.75 x 5.00 also with my paper trimmer.  Then I decided to add a border around the outside edge of this paper and used the Essential Glimmer Rectangles plate with Gold Foil and my Glimmer Hot Foil System to add  the dotted border.  This was then attached and centered onto the gold paper using my Easy Glide Permanent Tape Runner.  

Then I got brave and glimmered the Magnolia Glimmer Blooms from the new Yana's Blooms Collection  onto red glitter paper using Gold Foil and my Glimmer Hot Foil System.  It worked beautifully on my first try!  It was then die cut using the included die and my Platinum 6 die cutting machine.  I then added foam squares to the pack of the floral piece and attached it to to the front of the base card. 


Next I needed a sentiment so I decided to make it a birthday card and used the Elegant Occasions Sentiments.  These are some of my favorites.  I love the font and fancy script design.    This was foiled onto the same red cardstock as the background using Gold Foil and die cut with included die.  It was then attached to the front of the card using Bearly Art Liquid Glue. 


I think my experiment with foiling on glitter paper was a success.  Why don't you give it a try?  I am sure you will get different results with different papers, but it is fun to experiment and try different things.  

If  you click on SOME of the links in the blog or purchase from any of the vendors on the left side of each post,  please use my link (just click on the image for the store you want to use).  It will not affect your purchase in any way, but will provide me with a very small compensation for your order.  Some are affiliate links, some are not.  This is what helps me to be able to purchase new products to share with you!  Thank you!  It is very much appreciated.  

Thanks for stopping by and have an amazing day!

Jeanne
A Stroke of Jeanne-ius

Never Stop Creating


Friday, January 14, 2022

Yana's Bloom Collection Release Inspiration

 Today Spellbinders is featuring some of their new releases.  I am featuring two items from one of the releases called Yana's Blooms Collection.  This beautiful collection features wonderful stripes, sentiments, and magnolia blooms.  

I have chosen to do one card featuring the Magnolia Blooms Die set and the Magnolia Bouquet Glimmer Plate set.  Here are my inspirational projects:


For the first card I chose an A2 white base card. I then cut a piece of black cardstock to 5.25 x 4 inches using my paper trimmer.  This was adhered to the base card using my Easy Glide Adhesive Tape Runner.  Then I chose a piece of decorative paper that I had left over from my January Card Kit of the Month.  It was trimmed to 3.75 x 5 using my paper trimmer and then I foiled a border around it using The Glimmer Kit of the Month for February 2021 called the Scalloped Rectangle Glimmer Essentials with Sentiments.  I used the Glimmer Hot Foil System and gold foil to accomplish this.  It was then adhered to the black cardstock using  Easy Glide Adhesive Tape.  Using the same Glimmer set, I chose the "Hello" sentiment and foiled it onto white cardstock using the  gold foil  


For the florals, I die cut the Magnolia Blooms die set  (from the new collection) from Brushed Gold Cardstock using my Platinum 6 die cutting machine..  It was then glued to white cardstock using Bearly Art liquid Glue and colored in slightly using my copic markers.  I just added some shadows here and there.  Then I took the outline die from the same set and cut out the blooms.  These were then popped up onto the card front using foam squares.  I also cut out and popped up the sentiment  from The Glimmer Kit of the Month for February 2021 called the Scalloped Rectangle Glimmer Essentials with Sentiments and the small gold glittered tag that I used from the Card Kit of the Month for January 22.


For my second project, I chose to do them in purples.  So I chose another A2 white base card.  I Then cut a piece of medium purple cardstock to measure 4 x 5.25 using the  paper trimmer  and adhered it to the front of the base card using Easy Glide Adhesive Tape.  Then I cut two of Spellbinders Fluted Classic Ovals, one in white and one in light purple (as shown) using my Platinum 6 die cutting machine..  They were then adhered to the front of the card using the  Easy Glide Adhesive Tape runner as shown in the photo.  


Using the New Magnolia Bouquet Glimmer Plates and Lavender Petal Foil, I glimmered the flowers using the  Glimmer Hot Foil System.  They were then cut out using the included dies.  I did the same for the leaves, only used green foil for them.  After they all were foiled and cut out, I arranged them along the left side of the ovals as shown.  I chose the beautiful "Thank You" from the Elegant Occassion Sentiments Glimmer Plate and foiled it in Gold Foil on white cardstock.  It was then die cut using the included die.  I popped it up onto the card using foam squares.  Finally I added three medium purple enamel dots from my stash and called this card finished!


If you like my inspiration, please visit Spellbinders web page and especially the Yana's Bloom Collection for all the products included. 

If  you click on SOME of the links in the blog or purchase from any of the vendors on the left side of each post,  please use my link (just click on the image for the store you want to use).  It will not affect your purchase in any way, but will provide me with a very small compensation for your order.  Some are affiliate links, some are not.  This is what helps me to be able to purchase new products to share with you!  Thank you!  It is very much appreciated.  

Thanks for stopping by and have an amazing day!

Jeanne
A Stroke of Jeanne-ius

Never Stop Creating 


Thursday, January 13, 2022

Spellbinders January 2022 Clubs Inspiration Blog Hop + Giveaways!


If you are hopping along, you have just come from  Hussena Calcuttawala's Blog Post.

 Hi!  I am Jeanne Bobish, also known as A Stroke of Jeanneius!  Welcome to my blog.  As you can see, Spellbinders is having an inspirational  blog hop along with  giveaway.  To celebrate this release, they  are giving away a $25 gift certificate to 3 lucky blog readers – selected from the comments on their blog. Giveaway closes on Sunday, January 16th, 11:59 pm MST. The winner will be announced in this blog hop post the following Wednesday. 

Here are my inspirational projects:


I created these cards using the Small Die of the Month Club and the Clear Stamp and Die of the Month Club.  I started the card by using a white A2 card base.  Then I cut a piece of pink cardstock using my paper trimmer to cover the front of the base card.  Then using white cardstock, I cut out the  Small Die of the Month  using my platinum 6 machine.  All the pieces were then glued to the card except the heart pieces using bearly art liquid glue.  

Using the clear stamp of the month, I stamped the heart image with black copic friendly ink and cut it out using the Clear Stamp and Die of the Month I cut out the heart and adhered it to the center open heart area of the  small die.  It was then colored using my copic markers and popped up using foam squares.

The sentiment From the Clear Stamp and Die Club of the month was stamped onto white cardstock using black ink, cut out using the matching die and also popped up with foam squares.  I then tied a pink ribbon from my stash underneath the heart and added some sparkle hearts to every other heart cutout in the background (also from my stash)  The tiny flowers underneath the heart and bow were made using the die included in the Card Kit of the Month for January 22.


The second project I completed was a cute gift tag.  Using the Heart to Heart tag die set, I cut out a tag using White cardstock.  The pink cardstock was cut to fit the tag as shown using the paper trimmer.  I stamped, colored and cut out another of the heart images from the Clear Stamp and Die of the Month and popped it up off the tag with foam squares..  The bow and glimmer hearts from my stash were also added as shown.  The sentiment was stamped, cut and popped up the same as for the card.  


If you like what you see, Join a Club!  Just click here for all the details. Please visit Spellbinders for lots of great stamps, dies, tools, etc. that will enhance your crafting!

Thanks for stopping by and please be sure to Hop on over to Rosemary Dennis's blog next for more wonderful inspiration!

And don't forget to comment for your chance to win one of three $25.00 gift certificates!  Be sure to visit each fabulous designer's  blog listed below, and leave them some love.  


Spellbinders Blog
Sandi MacIver
Bibi Cameron
Annie Williams
Jill Hilliard
Kelly Taylor
Jean Manis
Sandra Nagel
Ilina Crouse
Virginia Lu
Deborah Jenkins
Hussena Calcuttawala
Jeanne Bobish You are here! 
Rosemary Dennis
Lin Brandyberry
Karen Yagel
Jenny Colacicco
Jessica Vasher
Melody Rupple
Birgit Norton
Alanna Moses
Rebecca Keppel

Friday, January 7, 2022

January Card Kit of the Month Day 3

   As you may know, the first of every month Spellbinders releases it's monthly club kits.  Today I will be sharing the second of several cards that I have made using the January Card Kit of the month, called Truly, Madly Deeply.   To see a video of all that you will receive in this kit simply follow this Link

And finally, here is all the info on clubs and subscriptions and  how you can save on multiple clubs.  Now onto today's cards: 


All the products used to create these cards were from the kit. All you need is your own essential craft tools like paper trimmer, detail pro sheers, liquid adhesive,  die cut machine and stamp block.  Everything else is included!

This is a beautiful kit and I hope that you will consider purchasing it.  There is no commitment!  You have until the 24th of December to order this, but don't wait! It might sell out before then. 

If  you click on SOME of the links in the blog or purchase from any of the vendors on the left side of each post,  please use my link (just click on the image for the store you want to use).  It will not affect your purchase in any way, but will provide me with a very small compensation for your order.  Some are affiliate links, some are not.  This is what helps me to be able to purchase new products to share with you!  Thank you!  It is very much appreciated.  

Thanks for stopping by and have an amazing day!

Jeanne
A Stroke of Jeanne-ius
Never Stop Creating

P.S.  Be sure to check back tomorrow for the last set of creations from this spectacular card kit!

Thursday, January 6, 2022

January Card Kit of the Month Day 2

  As you may know, the first of every month Spellbinders releases it's monthly club kits.  Today I will be sharing the second of several cards that I have made using the January Card Kit of the month, called Truly, Madly Deeply.   To see a video of all that you will receive in this kit simply follow this Link

And finally, here is all the info on clubs and subscriptions and  how you can save on multiple clubs.  Now onto today's cards: 


Here are the individual cards with close ups.


Here is the second card and close up.


All the products used to create these cards were from the kit. All you need is your own essential craft tools like paper trimmer, detail pro sheers, liquid adhesive,  die cut machine and stamp block.  Everything else is included!

This is a beautiful kit and I hope that you will consider purchasing it.  There is no commitment!  You have until the 24th of December to order this, but don't wait! It might sell out before then. 

If  you click on SOME of the links in the blog or purchase from any of the vendors on the left side of each post,  please use my link (just click on the image for the store you want to use).  It will not affect your purchase in any way, but will provide me with a very small compensation for your order.  Some are affiliate links, some are not.  This is what helps me to be able to purchase new products to share with you!  Thank you!  It is very much appreciated.  

Thanks for stopping by and have an amazing day!

Jeanne
A Stroke of Jeanne-ius
Never Stop Creating


Wednesday, January 5, 2022

January Card Kit of the Month 2021 - Day One Inspiration.

 As you may know, the first of every month Spellbinders releases it's monthly club kits.  Today I will be sharing the first of several cards that I have made using the January Card Kit of the month, called Truly, Madly Deeply.   To see a video of all that you will receive in this kit simply follow this Link

And finally, here is all the info on clubs and subscriptions and  how you can save on multiple clubs.  Now onto today's cards: 


Here is a close up photo of the first card.  


Here is the second card:


All the products used to create these cards were from the kit. All you need is your own essential craft tools like paper trimmer, detail pro sheers, liquid adhesive,  die cut machine and stamp block.  Everything else is included!

This is a beautiful kit and I hope that you will consider purchasing it.  There is no commitment!  You have until the 24th of December to order this, but don't wait! It might sell out before then. 

If  you click on SOME of the links in the blog or purchase from any of the vendors on the left side of each post,  please use my link (just click on the image for the store you want to use).  It will not affect your purchase in any way, but will provide me with a very small compensation for your order.  Some are affiliate links, some are not.  This is what helps me to be able to purchase new products to share with you!  Thank you!  It is very much appreciated.  

Thanks for stopping by and have an amazing day!

Jeanne
A Stroke of Jeanne-ius
Never Stop Creating


Monday, January 3, 2022

Spellbinders Clear Stamp and Die of the Month for January 2022

 Today I am featuring this pretty Spellbinders Clear Stamp and Die kit of the Month for January 2022.  The stamp and die set coordinate so making beautiful cards is even easier.  


I started this card using a A2 size White Card Base.  I then took some pretty pink colored cardstock and dry embossed it using an Spellbinders Heart and Soul  Embossing Folder and my Platinum 6 machine.  After embossing, I trimmed it down to 5.25 x 4 inches using my paper trimmer and attached it to the front of the base card using my Easy Glide Permanent Tape Runner.

The three stamps were then stamped onto X-Press it Blending Cardstock (the only paper I use for copic coloring) using Momento Tuxedo Black Ink.  I then colored each image  using my Copic Markers.  Next, they were cut using the coordinating die and placed onto the front of the card.  The top and bottom hearts were adhered using Bearly Art Liquid Glue.  The center heart was popped up using Foam Squares.  


As a final embellishment, I added some heart shaped sparkle drops from my stash to the front of the card.  

I think this would make a wonderful and different kind of Valentines card.  If you like it you can subscribe to the Clear Stamp and Die of the Month Club Kit.  There is no obligation, and you can cancel at any time!  There are also several other kits you may be interested in.  Check out the Spellbinders Club Kits for all the information.  

If  you click on SOME of the links in the blog or purchase from any of the vendors on the left side of each post,  please use my link (just click on the image for the store you want to use).  It will not affect your purchase in any way, but will provide me with a very small compensation for your order.  Some are affiliate links, some are not.  This is what helps me to be able to purchase new products to share with you!  Thank you!  It is very much appreciated.  

Thanks for stopping by and have an amazing day!

Jeanne


Saturday, January 1, 2022

New APG of the Month for January of 2022

 Happy New Year and welcome to Spellbinders Kits of the Month.  I am starting out with the APG of the Month this time.   I decided to create a card instead of a 3-d project.  I hope you like it.  


I started out by creating the tea cut with white and Brushed Gold cardstock using the included dies and my Platinum 6 die cutting machine.  I made it flat instead of 3-D version.  It was then adhered to a White 5x7 card base that was first covered with pink decorative paper from my stash sized to 6.75 x 4.75 using my paper cutter.  The decorative paper was adhered by using my easy glide tape runner.  The cup was adhered using foam squares to give the card some dimension.  I decorated the teacup with the included small flowers in pink cardstock, the leaves in green cardstock and used some fashion gold  embellishments for the centers.  They were adhered to the cup using Bearly Art Liquid Glue.  


As for the teabag, that was cut from Vellum, assembled and attached at the upper right of the card.  I attached some white thread/twine from my stash  to both the teabag and the tag.  The tag was cut from white cardstock and a pink flower (like the ones on the cup) and glued to the tag using liquid glue.  I cut the lettering for the teabag from brushed gold and the heart from the light pink 


As a final thought, I decided to add some of the larger flowers to the card.  I wanted them to look as though they were coming out from behind the cup.  The stems were cut from green cardstock and the flowers from two shades of pink.  I had to cut the stems on some of them to fit behind the cup.  They should have been attached before the cup, but, they were an afterthought after all.  


So here again is a photo of the finished project.  


I hope you will consider joining this or any of the monthly clubs.  They are all well worth the value and you will enjoy receiving a new one each month.  There is no obligation and you can quit anytime.  

If  you click on SOME of the links in the blog or purchase from any of the vendors on the left side of each post,  please use my link (just click on the image for the store you want to use).  It will not affect your purchase in any way, but will provide me with a very small compensation for your order.  Some are affiliate links, some are not.  This is what helps me to be able to purchase new products to share with you!  Thank you!  It is very much appreciated.  

Thanks for stopping by and have an amazing day!

Jeanne