Monday, June 27, 2022

Birdie and Cherry Blossom Thinking of You Card

 Today I am sharing a fun "Thinking of You" card.  I saw this adorable Spellbinders bird die on Scrapbook.com and really wanted it.  As a free gift, I also received the Marker Forte Circle Stencil and I immediately knew what I wanted to create.   All the products used are listed below with links. 


 I started out with an A2 size base card to which I added a piece of pink cardstock measuring the same as the card.  On a piece of white cardstock, I stenciled the circle using Distress Ink.   I then embossed another piece of white cardstock using the Spellbinders Garden Path Embossing Folder.  This piece was cut using a circle die from my stash that measured the same as the stenciled area.  

Next I created, assembled, and arranged the cherry blossoms, leaves and branches to my liking and tinted the large open blossoms with Altenew Pinkalicious ink.  

The little bird was done next in shades of yellow cardstock, assembled and glued to the front of the card as shown.  For the sentiment, I chose one from the Scrapbook.com Foiled Sentiments 41 pc package.  It was attached to the lower front.  I then called this card finished!  I hope you like it.  

If  you click on SOME of the links in the blog or purchase from any of the vendors on the left side of each post,  please use my link (just click on the image for the store you want to use).  It will not affect your purchase in any way, but will provide me with a very small compensation for your order.  Some are affiliate links, some are not.  This is what helps me to be able to purchase new products to share with you!  Thank you!  It is very much appreciated.  

Thanks for stopping by and have an amazing day!

Jeanne
A Stroke of Jeanne-ius
Never Stop Creating


A2  white base card

Spellbinders Little Chickadee Die set

Marker Forte A2 Spotlight Circle Stencil

Spellbinders Layered Cherry Blossoms

Tonic Circle Layering Dies (from stash)

Altenew Pinkalicious Ink

Ink brush

Ink Dauber

Distress Ink - Speckled Egg

Platinum 6 Die Cutting Machine

Easy Glide Adhesive Tape Runner

Bearly Art Liquid Glue

Paper Trimmer

Detail Tweezers

Best Ever Craft Tape

Circle Die, Foiled Sentiments, and cardstock from stash


Friday, June 17, 2022

Double Door Pop Up Card - Birthday

 While browsing thru facebook I came across a card that I really thought looked interesting.  It was by Michelle Gibson on the Let's Make Cards Facebook Page.  She has the instructions on how to make this fabulous card in the file section of that page.  So, I printed out the directions and created this lovely card.  (All the supplies are listed at the end of this post.)


I had this green polka dot paper (polka dots are gold metallic) in my stash and new it would make a fabulous card.  So I started with an A2 card base and cut out the pieces according to Michelle's directions on her printout.   I then had the fun of decorating the front of the card.  


I started by creatng the gold hexagon using Mirrored Gold paper and the hexagon dies.  I then had just received the Scrap Diva Rose Petal Flowers Die in the mail and decited to make some flowers with it in yellow.  They were tinted with distress ink in spiced marmalade.  I then cut some other flowers and greens using the Spellbinders Be Bold Blooms die set.  They were glued and arranged around the hexagon as shown above using hot glue and a glue gun.

For the sentiment I used Yana's Special Sentiment Glimmer Plates and glimmered the sentiment in Gold Foil.  It was then cut using the matching die and attached to the front of the card using foam squares.  

For the inside of the card, I decorated it with the green paper as instructed along with creating the mechanism which makes the doors open when the card is opened.  I wanted the doors to open and reveal another sentiment along with your hand-written note, so I stamped one with Versa Fine Clair Nocturne ink using the Birthday Unboxing Sentimetns.


I really love how this card turned out and will certainly make more of these!  Remember to get your directions under FILE on the Let's Make Cards Facebook Page!

If  you click on SOME of the links in the blog or purchase from any of the vendors on the left side of each post,  please use my link (just click on the image for the store you want to use).  It will not affect your purchase in any way, but will provide me with a very small compensation for your order.  Some are affiliate links, some are not.  This is what helps me to be able to purchase new products to share with you!  Thank you!  It is very much appreciated.  

Thanks for stopping by and have an amazing day!

Jeanne
A Stroke of Jeanne-ius
Never Stop Creating


SIPPLIES:

Double Door Pop-Up Card instructions by Michelle Gibson on Let's Make Cards Facebook 

    page, under the MORE tab and then under the FILE section

Spellbinders Birthday Unboxing Sentiments (for the inside)

Spellbinders Be Bold Blooms

Scrap Diva Rose Petal Flowers

Spellbinders Yana's Special Sentiments Glimmer Plate

Pink Fresh Studio Nested Hexagons

Mirror Gold Cardstock 

Platinum 6 Die Cutting Machine

Easy Glide Adhesive Tape Runner

Bearly Art Liquid Glue

Small Foam Squares

Paper Trimmer

Detail Tweezers

Versafine Claire Nocturne Ink 

Distress Ink - Spiced Marmalade

Hot Glue Gun

Hot Glue Sticks

Glimmer Hot Foil System

Gold Foil 

Ink Daubers (small) 

Misti 

Susan's Garden Ultimate Tool Kit (for flower shaping)


Thursday, June 16, 2022

Flip Fold Neutral Gender Baby Card

 While I was surfing You Tube the other day, I came across this old video by May May Made It.  It was the instructions for how to create a flip fold card.  (I am in no way affiliated with May May, I just happened upon this video and found it extremely helpful).  Well, this video was from 5 years ago so I am a little late to the party, LOL!, but I still love making this card.  Her instructions are so easy to follow, that I will not repeat them here.  If you are interested in making one of these cards, just click on the link and watch the video.  I will have a full supply list at the end of this post.


I started out with a white top fold A2 card base.  I then created the mechanism following the instructions in the video linked above.  Then came the fun part of decorating.  I had many baby items in my stash, some are still available, some are discontinued, but I am sure you have something in your stash that could work.  

I made this card to be gender neutral of soft yellow and greens.  The photo made the colors a little harsher than they really are.  

I decorated each of the 4 panels with die cuts, but you could use stamps or whatever you have.  You can also make the card any size you wanted.  I chose my normal A-2 size card.  I also used a corner round punch to round off each corner of the squares.  But this too, is optional.  

I decided to keep the front of the card simple,  so I just stamped the sentiment and  colored it in with my copic markers and decorated it with the papers I used for inside the card.  


Imagine how amazed the recipient will be when they receive such a beautiful and fun card.  You can decorate and create for any holiday or reason.  Just have fun, the possibilities are endless!  I am sure that I will be making many more of these cards in the future!

Please Note:  I would definitely hand deliver this card and place it in a 5x7 envelope because of the thickness.  

If  you click on SOME of the links in the blog or purchase from any of the vendors on the left side of each post,  please use my link (just click on the image for the store you want to use).  It will not affect your purchase in any way, but will provide me with a very small compensation for your order.  Some are affiliate links, some are not.  This is what helps me to be able to purchase new products to share with you!  Thank you!  It is very much appreciated.  

Thanks for stopping by and have an amazing day!

Jeanne
A Stroke of Jeanne-ius
Never Stop Creating


SUPPLIES:

May May Made it You Tube Video for card construction instructions.

A2 top fold card base

Cottage Cutz Stitched Square Frames

Cottage Cutz Baby Giraffe Die Cut

Spellbinders Lacey Frames Die Set

Altenew Little One Stamp Set

Sugar Pea Designs Baby Pin Dies (discontinued)

Impression Obsession Patchwork Elephant die

Taylored Expressions - Welcome Baby Bubble Greetings 2 (discontinued)

Copic Markers

White Jelly Roll Pen

Corner Round Punch (optional)

Platinum 6 Die Cutting Machine

Easy Glide Adhesive Tape Runner

Bearly Art Liquid Glue

Small Foam Squares

Paper Trimmer

Detail Tweezers

Versafine Claire Nocturne Ink

Detail Scissors

All other products used were from my stash

Wednesday, June 15, 2022

Another Spellbinders Birthday Card!

 As we celebrate Spellbinder's 20th birthday, I decided to make yet another birthday card, this time using the new Geo Screen embossing folder.  All supplies are listed at the end of this post.  


As soon as I saw this folders impression, I knew I had to have it!  After embossing the white cardstock with the folder, I thought it needed something else, some circles inside the circle impression from the folder.  So, I took an older Glimmer of the Month Kit from May of 2021 and just used the die portion to cut out colored circles.  They were a lot smaller than the impression from the folder, but that is okay.  I glued then into the center of each circle as shown.  This was then glued to a light blue base piece and attached to the front of an A2 white base card. 

For the sentiment I also chose an older Glimmer of the Month Kit from June of 2021 called Sweet and Snarky Birthday Wishes.  I glimmered the larges sentiment with gold foil and cut it out using the included die.  I then mounted it onto some soft green cardstock and fussy cut around it so that it would stand out a little from the white background.  It was then popped up onto the front of the card and that was it!  Easy Peasy!  A quick and easy birthday card appropriate for either a male or female friend.  

I hope you like it!  Please stop by Spellbinders and check out all the fabulous products that they have available!  I know you will find something you like!

If  you click on SOME of the links in the blog or purchase from any of the vendors on the left side of each post,  please use my link (just click on the image for the store you want to use).  It will not affect your purchase in any way, but will provide me with a very small compensation for your order.  Some are affiliate links, some are not.  This is what helps me to be able to purchase new products to share with you!  Thank you!  It is very much appreciated.  

Thanks for stopping by and have an amazing day!

Jeanne
A Stroke of Jeanne-ius
Never Stop Creating


SUPPLIES

A2 white card base

Geo Screen Embossing Folder

GOM-MAY21 Spot on Background and Sentiments

GOM-JUN21 Sweet and Snarky Birthday Wishes

Gold Foil

Scissors

 Glimmer Hot Foil System

Platinum 6 Die Cutting Machine

Easy Glide Adhesive Tape Runner

Bearly Art Liquid Glue

Small Foam Squares

Paper Trimmer

Detail Tweezers

Cardstock from stash


Tuesday, June 14, 2022

Happy Birthday Spellbinders!!!

 Today is Spellbinders 20th birthday!  Can you believe it!?  I have been a huge fan of them since I began card making and I still love them today! 

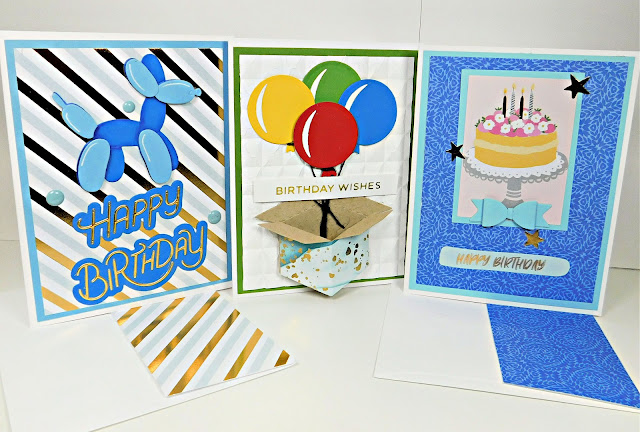
For this special birthday celebration, I have created three cards using items from the new Birthday Celebrations Collection which is also being released today.  All products used will be listed at the end of this post.  


The first card was made using both the Balloon Party Animal Die set and the Stylized Happy Birthday die set.  I started with an A2 card base and added some pretty papers from my stash.  I cut the balloon animal using two different blue cardstocks and tinted the darker blue with Blueprint Sketch Distress Ink.  I added highlights with a white jellyroll pen The lighter colored balloons were popped up using foam squares.  The sentiment was cut from the same blue cardstock and mirrored gold paper to match the other papers I chose.  It was glued together and then to the front of the card.  Here is the finished product:


For the second card, I also started with an A2 card base.  It was then layered with green cardstock and then white which was embossed using one of Spellbinders New 3D Embossing folder entitled Tile Mosaic.  (Please Note:  You must use the new Universal Plate System with your Platinum 6 machine in order to cut out the 3D dies without breaking your machine!)This was also glued onto the front of the card.  I cut out the box using the Surprise Box die set and adhered it to the front bottom of the card.  I used some printed paper to glue to the front piece to make it appear wrapped.  Then I cut 4 different colored balloons, assembled and added some black thread/twine to each one they were then glued to the front of the card using liquid glue and some foam squares for the red balloon.  The strings were tied together and fed into the box.   For the sentiment I used the Everyday Sentiments II glimmer plates along with gold foil.  It was also popped up with foam squares.  


And last but not least, I created this pretty A-2 sized card using the Birthday Celebration Embellishment Bundle for the cake, stars and sentiment.  The bow was made using the mini bow die also newly released today.  It makes just the cutest little bow.  You are definitely going to want to add this little cutie to your stash.  The printed paper and the other cardstock was all from my stash.  


Well I hope you like all these cards, We are always in need of birthday cards and here are three perfect examples.  For more birthday inspiration check out my previous post on the Spellbinders Card Kit of the Month for June 22 - Party Hats and Streamers!  Thanks for stopping by and be sure to check out the complete supply list below!

If  you click on SOME of the links in the blog or purchase from any of the vendors on the left side of each post,  please use my link (just click on the image for the store you want to use).  It will not affect your purchase in any way, but will provide me with a very small compensation for your order.  Some are affiliate links, some are not.  This is what helps me to be able to purchase new products to share with you!  Thank you!  It is very much appreciated.  

Thanks for stopping by and have an amazing day!

Jeanne
A Stroke of Jeanne-ius
Never Stop Creating


SUPPLIES

A2 Card Base

Balloon Party Animal

Stylized Happy Birthday

Tile Mosaic 3D embossing Folder

Color Block Balloons 

Surprise Box Die

Everyday Sentiments II Glimmer Plates

Cheerful Occasions Paper Pad

Mini Bow Die

Birthday Celebrations Embellishment Bundle

Distress Ink - Blueprint Sketch

Gold Foil

Glimmer Hot Foil System

Mirror Gold Cardstock 

Platinum 6 Die Cutting Machine

Universal Plate System for Platinum 6 machine

Easy Glide Adhesive Tape Runner

Bearly Art Liquid Glue

Small Foam Squares

Paper Trimmer

Detail Tweezers

White Jelly Roll Pen 


Saturday, June 4, 2022

Spellbinders Kit of the Month for June 2022 - Party Hats and Streamers

We always need birthday cards, and this month's Spellbinders kit of the month is all about birthday celebrations!  If you are looking to stock up on birthday cards, this is the kit for you. It is entitled Party Hats and Streamers and I have completed 4 different cards to inspire you .To see everything that is included with this club simply click here to see a video showing all the contents. For more information on club memberships, just click here .


This is just four examples of what can be made with this kit.  Just a little imagination and this kit and you will have lots of Birthday Cards on hand for someone's special day!

If  you click on SOME of the links in the blog or purchase from any of the vendors on the left side of each post,  please use my link (just click on the image for the store you want to use).  It will not affect your purchase in any way, but will provide me with a very small compensation for your order.  Some are affiliate links, some are not.  This is what helps me to be able to purchase new products to share with you!  Thank you!  It is very much appreciated.  

Thanks for stopping by and have an amazing day!

Jeanne
A Stroke of Jeanne-ius
Never Stop Creating


Supplies

KOM-JUN22 - Party Hats and Streamers

Easy Glide Adhesive Tape Runner

Bearly Art Liquid Glue

Paper Trimmer


Friday, June 3, 2022

Spellbinders Die of the Month for June 2022 - Stylized Border Trio

 Today I will be showing off two cards that I created using this month's Spellbinders Die of the Month for June 2022 called Stylized Border Trio.  For information on all the club kits just click here.  All the supplies used will be listed below. 


For the first card I started with a white A2 base card and added a mat  of both dark blue solid cardstock and then another of multicolor printed paper.  To that I added the flower border, then a small strip of the dark blue cardstock and cut the small border to adhere to that and one large border below the strip.  These were all cut from white.  I stamped and cut out the sentiment from t he clear stamp of the month and placed it onto another piece of blue cardstock then added some colorful flowers that matched the printed paper and leaves from the Mini Blooms and Springs set and the Petite Floral Potpourri.


This second card is my absolute favorite.  I also started with an A2 size white cardbase to which I added some soft green as a mat which was popped up off the base  card.  To that I added some pretty green and white printed paper along with a thin strip of gold mirrored cardstock and then one of the borders underneath from the monthly Die of the Month Kit for this month.  Then I hot foiled the Diamond Floral Frame onto the light green paper using gold foil'  die cut it out, and placed it onto the front of the card.  I also hot foiled the Glimmer Edge butterfly and the Glimmer Layered Flowers  also in gold foil.  The center largest flower was then popped up using foam squares.  Finally I foiled the sentiment onto white paper and cut it out with the coordinating die also popped up with foam squares. 


I hope you like both cards and will check out all the club kits Spellbinders has to offer.  They are amazing and you can cancel anytime and just receive the ones you want. 

If  you click on SOME of the links in the blog or purchase from any of the vendors on the left side of each post,  please use my link (just click on the image for the store you want to use).  It will not affect your purchase in any way, but will provide me with a very small compensation for your order.  Some are affiliate links, some are not.  This is what helps me to be able to purchase new products to share with you!  Thank you!  It is very much appreciated.  

Thanks for stopping by and have an amazing day!

Jeanne
A Stroke of Jeanne-ius
Never Stop Creating


Supplies:

DOM-JUN22 Stylized Border Trio

SOM-JUN22 - Paisley Bouquet

Petite Floral Potpourri

Mini Blooms and Sprigs

Diamond Floral Frame Hot Foil Plate

Glimmer Layered Flowers Hot foil Plate

Yana's Special Sentiments Hot Foil Plate

Glimmer Edge Butterflies Hot Foil Plate 

Gold Foil

Glimmer Hot Foil System

Mirror Gold Cardstock 

Platinum 6 Die Cutting Machine

Easy Glide Adhesive Tape Runner

Bearly Art Liquid Glue

Small Foam Squares

Paper Trimmer

Detail Tweezers

Versafine Claire Nocturne Ink 


Thursday, June 2, 2022

Spellbinders New APG of the moth for Jun 2022 - Road Trip

 Today I have created a 5x7 card instead of the 3D Vignette this die set was made for.  It is the Amazing Paper Grace Die of the Month for June 2022 entitled Road Trip.  I found this card especially fun to create and added an extra little something to it.  All supplies used are listed at the end of this post.  To view this particular club click here .  For information on all the clubs Spellbinders offers, click here. 


To create this card I started with a white 5x7 card base because I wanted the card large enough to show off the card without being crowded.  I then added some soft green cardstock the same size as the card and adhered it to the front.  It has a slight linen look to it.  I then used the APG Die of the Month from March of 2022 Bella Ovalete with white and another soft green cardstock.  This was then adhered to the card front.  The car was made using another slightly darker shade of green along with mirrored silver, white, red, and black cardstock.  I decided to make the kids which were adhered to the inside back of the card.  and the mother and father were adhered to the inside front of the card.  I then placed some foam squares (two high) and sandwiched the front and back of the car together.  Then I placed a wobble to the card and attached to the front of the card.  


Instead of placing the Sentiment across the back of the car, I decided to place it below the card and flanked it with some blue flowers.  I also added the blue flowers to the top two corners to balance them.  The center (larger) flowers were popped up using foam squares.  

As I said, this card was really fun to make!  I really wanted to do something different with the vignette, so  if you don't like the 3D vignettes, you can always use them for cards.  I also wanted to make it look like the kids were excited about the trip, so I put their hands in the air.  

I hope you like this card and will give it a try on your own.  Please be sure to stop by Spellbinders and check out all the great clubs they have available. 

If  you click on SOME of the links in the blog or purchase from any of the vendors on the left side of each post,  please use my link (just click on the image for the store you want to use).  It will not affect your purchase in any way, but will provide me with a very small compensation for your order.  Some are affiliate links, some are not.  This is what helps me to be able to purchase new products to share with you!  Thank you!  It is very much appreciated.  

Thanks for stopping by and have an amazing day!

Jeanne
A Stroke of Jeanne-ius
Never Stop Creating


Supplies:

A7 white card base

DOMAPG-JUN22 - Road Trip

DOMAPG-MAR22 - Bella Ovalette

Be Bold Blooms

Mini Blooms and Sprigs

Mirrored Silver Cardstock

Artist Impressions Action Wobble

Bearly Art Liquid Glue

Easy Glide Adhesive Runner

Foam Squares

Platinum 6 die cutting machine

Paper Trimmer

Detail Scissors

Detail Tweezers.

Printed and colored cardstock from my stash


Wednesday, June 1, 2022

Spellbinder's Clear Stamp and Die of the Month for June 2022 - Paisley Bouquet

 If you are into paisleys you are going to love this set!  Filled with paisleys and delicate design pieces this set makes some beautiful cards.  I have made three from this set shown below and I love how they turned out!  

Join the Clear Stamp & Die of the Month Club and receive an expertly designed clear stamp set and coordinating die set each month, complete with inspiration. Plus, members get store savings, extra deals, gifts, and more. Click Here to learn more about club membership. 


All the supplies used are listed below.  These cards were created using soft pastel colors.  I started out stamping the first card with the paisley designs with black ink onto some multicolored background paper that I had in my stash.  I attached some soft yellow paper to the card base and then trimmed and added the background piece I created.  I then placed a strip of the yellow paper across the center of the card and colored the largest motif with my copic markers and popped it up on the right side of the strip.  I also stamped the sentiment from this set onto some cream colored paper and cut it out to fit onto the left side of the strip.  It was also popped up.  Finally, I added some stitching marks along the stip using a fine line black marker.  


I wasn't going to make this second card, however I had several strips left from cutting the background from the first card and hated to waste them.  So, I matted a base card with pink and blue cardstock and then added a third layer of a softly printed pink background paper.  I glued the strips onto the card as shown and then hot foiled a sentiment from a previous Glimmer of the Month Kit in gold foil and then cut it out using Spellbinders labels twenty eight.  I then popped it up onto the card using foam squares.  


This third card is probably my favorite of the three, although it is hard to choose.  For this card I used all the same colors of cardstock as before starting with a white base card.  I then cut a rectangle from the soft yellow cardstock using the Elegant Twist Rectangle die.  I also cut one from blue paper and just used the inside portion for the next layer.  I finished the layers by adding a pink Elegant Oval to the front.  Then I stamped, cut out, and colored with copic markers the three round pieces that come with the kit.  They were then colored with copic markers, die cut using the matching die set and placed above the oval as shown.  Some were popped up with foam squares.  For the sentiment, I again foiled one from the Everyday Sentiments set using gold foil, cut it out, and popped it up across the front.  


I hope you like this set as much as I do.  Not only the soft pastel colors, but also the wonderful designs the stamp and die of the month created!

If  you click on SOME of the links in the blog or purchase from any of the vendors on the left side of each post,  please use my link (just click on the image for the store you want to use).  It will not affect your purchase in any way, but will provide me with a very small compensation for your order.  Some are affiliate links, some are not.  This is what helps me to be able to purchase new products to share with you!  Thank you!  It is very much appreciated.  

Thanks for stopping by and have an amazing day!

Jeanne
A Stroke of Jeanne-ius
Never Stop Creating


Supplies:

CSDOM-June22 Paisley Bouquet

Labels Twenty Eight Die Set

Elegant Twist Ovals Die Set

Elegant Twist Rectangles Die Set

Essential Glimmer Sentiments

Gold Foil

Copic Marlers, R83, YG01, Y32, B01

VersaFine Claire Nocturne Ink

Glimmer Hot Foil System

Platinum 6 Die cutting machine

Foam Squares

Bearly Art Liquid Glue

Easy Glide Tape Runner

Paper Trimmer

scissors

fine line black marker

Cardstock and papers from stash