Monday, April 25, 2022

Pie Perfection Collection from Spellbinders

 If you have not seen the newly released Pie Perfection collection from Spellbinders, you are in for a real treat.  There are so many different dies in this collection that will make you pie making paper crafting so much fun!  Just check out the examples I am sharing today.  


The first card, features a strip of printed paper from the Spellbinders Through the Year Prints which I thought was perfect for this "apple pie" card.  I started with an A2 card base.  Added a mat of red paper and a strip of the apple printed paper.  I then cut a green circle and topped with Elegant Twist Circles to create the background for my pie.  I then created the pie and inked the edges of the crust with Vintage Photo Distress Ink.  I used the Delicious Decorations Die set for the accents.  The sentiment was from the perfect Pie Sentiments and Fillings stamp set and was popped up using foam tape.  


The middle card also started with an A2 card base.  I used some red check paper from my stash for the matted background.  I then assembled the pie box using The Bakery Box die set and some clear acetate.  I then created the pie using the Sky View Pies die sent, tinted the crust with vintage photo distress ink and glued it to the card underneath the bakers box.  I then cut the utensils from Brushed silver paper using the Serve it Up die set.  The utensils were then adhered to the card and tied with a thin piece of red cording.  I added a cherry to the box to signify it was a cherry pie using the cherry from the Serve a Slice set.  The sentiment was also from the Perfect Pie Sentiments and Fillings set and matted with red cardstock.  It was then popped up using foam squares.  


The third card made me think of pumpkin pie so I started with an A2 card base, matted it first with pumpkin colored cardstock and second with a pumpkin colored plaid cardstock.  I then made a whole pumpkin pie using the Perfect Pies Dies and used the pumpkin colored cardstock for the pie filling.  I  also tinted all the crusted with the vintage photo distress ink.  The utensils were cut from Brushed Silver cardstock, and the slice of pie was cut from the Serve A Slice die set.  I placed it onto a white plate and stamped the sentiment using the same stamp set as above and popped it up with foam squares.  


All the elements used will be listed below.  I hope you will check out this collection as the possibility for cardmaking is endless!  

If  you click on SOME of the links in the blog or purchase from any of the vendors on the left side of each post,  please use my link (just click on the image for the store you want to use).  It will not affect your purchase in any way, but will provide me with a very small compensation for your order.  Some are affiliate links, some are not.  This is what helps me to be able to purchase new products to share with you!  Thank you!  It is very much appreciated.  

Thanks for stopping by and have an amazing day!

Jeanne
A Stroke of Jeanne-ius
Never Stop Creating

Supplies:

A2 Card Base

Sky View Pies Die Set

The Baker's Box Die Set

Dish it Up Die Set

Delicious Decorations Die Set

Perfect Pies Die Set

Serve a Slice die set

Pie Perfection Sentiments and Fillings Stamp Set

Standard Circles Large Die Set

Elegant Twist Circles Dies

Platinum 6 die cutting machine

Vintage Photo Distress Ink

Versafine Claire Nocturne Ink 

Ink Dauber

Through the Years Paper Pack

Easy Glide Adhesive Tape Runner

Bearly Art Liquid Glue

Foam Squares

Paper Trimmer

Detail Tweezers

Brushed Silver Cardstock 

Clear Acetate

all other paper, ribbon, cardstock, etc. from stash


Friday, April 22, 2022

Spellbinders Inspired Basics Collection

 Happy Friday Everyone!  If you love to decorate you cards and packages this collection is for you!  Today I am featuring two projects from the Spellbinders New Release - Inspired Basics Collection.  


I decided to make birthday cards since that is the most requested card type I get.  I will list all the supplies used for each card at the end of this post. 


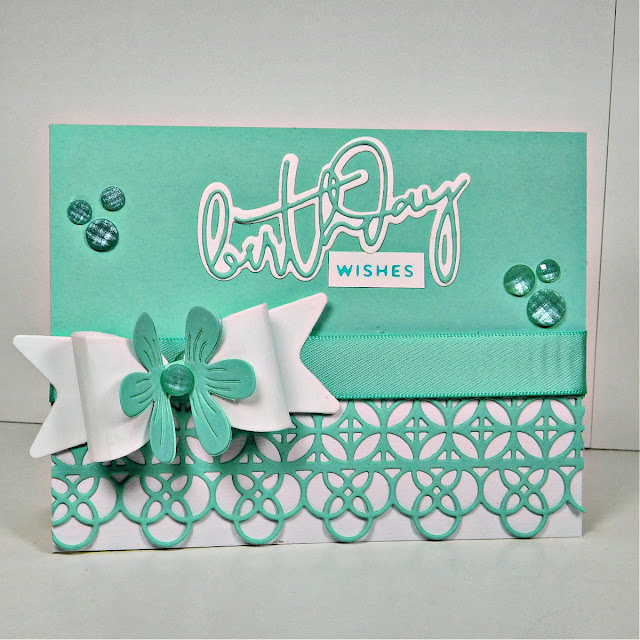
This first card features two of the dies from this newly released collection.  To create the card, I started with an A2 base card, Then I cut a piece of soft green paper the same size as the front of the card.  The paper was cut along the bottom using the Create a Slimline Border dies to create a decorative edge.  I added some matching ribbon from my stash across the top of the border.  The the bow was cut from the new Create a Flutter and Flower Bow die set and attached to the ribbon as shown.  

For the sentiment I first used Yana's Layered Script Sentiments Dies for the word Birthday and foiled the word wishes using the Splatter Sentiments Foil Plate and Moon Dust Foil. The gems were added as a final touch also from my stash.


For this second card, I also started with a white A2 card base.  I then matted some pink paper and pink and blue printed paper from my stash.  These were both adhered to the front of the card.

Next, I cut a tag from matching blue paper using the newly released Create a Decorative Tag.  The first time in white cardstock (just a plain tag)  Then again from blue paper using the decorative borders as shown.  I then glued the white tag underneath the blue one so that the cut borders showed.  To the top of the tag, I added a bow using the Create a Flutter & Flower Bow die set.  It was then attached to the top of the tag.  I decorated the tag using the Mini Blooms and Sprigs die set and arranged the flowers as shown.  Finally I stamped the sentiment using black ink and the CSOM-MAY21 - Borders and Sentiments.

I really like this new release and I am sure you will be seeing lots more of it in the future.  

If  you click on SOME of the links in the blog or purchase from any of the vendors on the left side of each post,  please use my link (just click on the image for the store you want to use).  It will not affect your purchase in any way, but will provide me with a very small compensation for your order.  Some are affiliate links, some are not.  This is what helps me to be able to purchase new products to share with you!  Thank you!  It is very much appreciated.  

Thanks for stopping by and have an amazing day!

Jeanne
A Stroke of Jeanne-ius
Never Stop Creating

Supplies:

A2 White Card Bases

Create a Flutter and Flower Bow Die Set

Create a Decorative Tag Die Set

Create a Slimline Border Die Set

Yana's Layered Script Sentiments Die Set

Mini Blooms and Sprigs Die Set

CSOM-MAY21 Borders and Sentiments Stamp

Splatter Sentiments Glimmer Foil Plate

Moon Dust Foil

Platinum 6 die cutting machine

Glimmer Hot Foil System

Glue dots

Easy Glide adhesive tape runner

Bearly Art liquid Glue

Misti Stamping Platform

We R Memory Keepers Mini Guillotine Paper Trimmer

VersaFine Clair - Nocturne Ink 

Ribbon, Cardstock, Pattern Paper and gems all from my stash


Wednesday, April 20, 2022

Layered Fleur Bouquet Slimline Collection - Day 2

 Yes this is the second project I created using two of the dies from the Spellbinders new release Layered Fleur Bouquet Slimline Collection.  


I don't normally make slimline cards, but the die was made for one.  So I started this card with a white base, slimline card.  I then added the Half Slimeline Oval Die which was cut twice using Brushed Gold cardstock.  It was then adhered to card as shown.  

For the center of the oval I used the new Layered Cherry Blossom Die also from this new collection.  I cut the blossoms from pink cardstock and brushed the centers with Worn Lipstick Distress Ink using aniInk blending tool.The blossoms were assembled and arranged onto the branch with leaves as shown. I used some Fashion Gold embellishments for the centers of the two open blossoms.  The sentiment was cut using pink cardstock.  

I really love this collection, especially the cherry blossom die.  I am sure I will be findIing many new ways to use it in the future!

If  you click on SOME of the links in the blog or purchase from any of the vendors on the left side of each post,  please use my link (just click on the image for the store you want to use).  It will not affect your purchase in any way, but will provide me with a very small compensation for your order.  Some are affiliate links, some are not.  This is what helps me to be able to purchase new products to share with you!  Thank you!  It is very much appreciated.  

Thanks for stopping by and have an amazing day!

Jeanne
A Stroke of Jeanne-ius
Never Stop Creating

Supplies:

Half Slimline Oval Die

Layered Cherry Blossom Die

Distress Ink - Worn Lipstick

Ink Blender from stash 

Bearly Art Liquid Glue

Brushed Gold Cardstock

Paper Trimmer

Platinum 6 Die Cutting Machine

Detail Pro Shears from stash

Detail tweezers

All other cardstocks used  were from my stash.

Tuesday, April 19, 2022

Layered Fleur Bouquet Slimlines Collection by Becca Feeken

 I am a little late today with my post, but had a busy morning.  Today I am featuring the first of two projects from the Spellbinders Layered Fleur Bouquet Slimlines Collection by Becca Feeken.


 I don't normally do slimline cards, but this particular die set required it.  I started out with a white base card and added some dark blue cardstock, the same size as the card front and attached it to the base.  Next I cut two of the Half Slimline Oval die set in a medium shade of blue cardstock and attached to the card front as shown. 

Next using both the Petite Floral Potpourri and the Mini Blooms and Sprigs die sets I created various sizes of flowers and leaves.  Once flowers were assembled, I attached them to either side of the card as shown above.  

The sentiment was then cut from the medium blue and white cardstocks and layered onto the center of the card offset slightly to give the appearance of a shadow.  

I really love how the blues all go so well on this card!  I hope you like it too!

If  you click on SOME of the links in the blog or purchase from any of the vendors on the left side of each post,  please use my link (just click on the image for the store you want to use).  It will not affect your purchase in any way, but will provide me with a very small compensation for your order.  Some are affiliate links, some are not.  This is what helps me to be able to purchase new products to share with you!  Thank you!  It is very much appreciated.  

Thanks for stopping by and have an amazing day!

Jeanne
A Stroke of Jeanne-ius
Never Stop Creating

Supplies:

Half Slimline Oval Etched Die

Petite Floral Potpourri etched dies

Mini Blooms and Sprigs etched dies

Bearly Art Liquid Glue

Easy Glide Adhesive Tape Runner

Paper Trimmer

Tweezers

Platinum 6 die cutting machine

Blue roses and all cardstock was from my stash.


P.S.  Be sure to check back tomorrow for the second project from this collection!


Monday, April 18, 2022

Spellbinders Essential Glimmer Solid Shapes Collection - Oval

 I hope everyone had a wonderful Easter Sunday!  Now it is Monday and back to work!  Today I am featuring a product from the Essential Glimmer Solid Shapes Collection from Spellbinders.  This is a must have for any craft room.  This post is featuring the Essential Glimmer Solid Oval, but it comes in square, circle and rectangle as well.  


These solid shape glitter plates work wonderfully with the negative foil used to create other designs. 

To create this particular card, I started out with an A2 card base.  I then layered it with both light blue and a watercolor print papers.  Next I  had created a striped card using the Diagonal Stripes Glimmer plate and kept the negative.  I placed the negative which was created using Aura Foil over the oval and hot foiled it to white cardstock.  This created the striped design you see on the card.  The oval was then cut using an oval die and adhered to the front of the card. 

To create the beautiful flowers, I used the Blooming Rose Dies and white cardstock which I colored using Pool Play Pan Pastels using a detail blending brush.  They were then glued and assembled.  In the center of the three larger flowers, I glued some prills.  The flowers were arranged along with the leaves along the left side of the oval as shown.

For the sentiment, I chose to use the DOM-SEP21, Layered Mix and Match Sentiments in blue and white.  

I think it turned out beautifully and love how all the blues and the foil work so well together.  I know I will be using this plate along with the other shapes a lot in the future.  

If  you click on SOME of the links in the blog or purchase from any of the vendors on the left side of each post,  please use my link (just click on the image for the store you want to use).  It will not affect your purchase in any way, but will provide me with a very small compensation for your order.  Some are affiliate links, some are not.  This is what helps me to be able to purchase new products to share with you!  Thank you!  It is very much appreciated.  

Thanks for stopping by and have an amazing day!

Jeanne
A Stroke of Jeanne-ius
Never Stop Creating

Supplies:

Essential Glimmer Solid Oval

DOM-SEP21 - Layered Mix and Match Sentiments

Diagonal Glimmer Stripes Plate 

Pan Pastel - Pool Play

Detail Blending Brush

Flower Shaping Kit

Prills Mini Pearls

Aura Foil

Bearly Art Liquid Glue

Easy Glide Adhesive Tape Runner

Glimmer Hot Foil System

Platinum 6 Die Cutting Machine

Paper Trimmer

Details Pro Shears

Tweezers

Cardstock and other products not listed above were from my stash.


Friday, April 15, 2022

Through The Garden Gate Collection - Gardenia Release

 Today I am featuring another fabulous die set from the Through the Garden Gate Collection by Susan Tierney-Cockburn.  If you haven't seen all of Susan's die sets, you are in for a special surprise!  Her dies make the most realistic flowers I have ever seen.  Here I have created a card using the Gardenia die set from the newest collection. 


I think this card turned out beautiful and I hope you agree.  All supplies used are listed below.  I started with an A2 white card base.  I then cut out a piece of light blue cardstock and embossed it using the Diamond Plaid Embossing Folder.  This was then attached to the card base.  

Next I die cut a piece of watercolor printed paper with the same colors using the Vintage Stitched Squares die set, which unfortunately, I found out later, has been discontinued.  But, you could use any square dies you have to get a similar affect.  This was then added to the center front of the card to form a diamond shape. 

The gardenia was next.  I cut it from white cardstock and colored the flower near the center of each petal with my copic marker #YG00.  The leaves were also colored with the copic markers using YG67, and YG99.  

The flower and bud were assembled and arranged onto the card front.  For a sentiment I chose to use my More Sentiment  Glimmer plates along with Moon Dust hot foil and foiled the sentiment onto white cardstock.  I then cut a  fishtail end and tucked it under the flowers as shown. 

Lastly, I added clusters of three clear dots from my stash.  As I stated earlier, I really love how this one turned out.  The gardenia is absolutely beautiful and I love how the soft yellow peaks out of the petals.  

If  you click on SOME of the links in the blog or purchase from any of the vendors on the left side of each post,  please use my link (just click on the image for the store you want to use).  It will not affect your purchase in any way, but will provide me with a very small compensation for your order.  Some are affiliate links, some are not.  This is what helps me to be able to purchase new products to share with you!  Thank you!  It is very much appreciated.  

Thanks for stopping by and have an amazing day!

Jeanne
A Stroke of Jeanne-ius
Never Stop Creating

Supplies:

Gardenia Etched Die

Diamond Plaid Embossing Folder

Vintage Stitched Squares (Retired)

More Sentiments Glimmer Hot Foil Plates

Moondust Hot Foil

Glimmer Hot Foil System

Platinum 6 die cutting machine

Paper Trimmer

Detail Pro Shears

Glue Dots

Easy Glide adhesive tape runner

Bearly Art Liquid Glue

Copic Markers

Thursday, April 14, 2022

Through the Garden Gate collection - Floribunda Rose Release

 Today is Spellbinders release day and boy do they have some fabulous products for you this month!  I am starting off with one of the die sets from the Through The Garden Gate Collection by Susan Tierney-Cockburn.  If you are not familiar with Susan's dies, she makes the most fabulous, realistic floral dies around!  Today I am using her new Floribunda Rose die set:


Just look at that beautiful rose!  I decided to make a square card for this particular die set.  I started off with a 5.5" square white card base which I cut myself from white cardstock.  To that, I added a striped rose background paper that measured 5 x 5 " as a mat.  Next, I took a  piece of pearlized, textured white cardstock and cut the edges by using the DOM-Jul21 which gave me the design on the top and bottom of the piece.  This strip measures approx. 3" once die cut.  I adhered it to the front of the card across the middle.  Next I created the rose by cutting out the number of petals shown on the die for each peice.  They were cut from white cardstock and colored with my copic markers  I used R83 and R85 for the rose and YG67 and YG63 fr the leaves.  The petals were then glued together using hot glue for a better, quicker hold.  I adhered the flower to the front of the card and then added the sentiment from the Through The Garden Gate Sentiment Stamp set onto pink cardstock and adhered as shown.  As a final touch, I added some pink glittered gems and a  pink bow, both from my stash. 

I LOVE how this card turned out.  The rose is so beautiful and realistic looking.  I don't normally create square cards, but this die set called out for one.

If  you click on SOME of the links in the blog or purchase from any of the vendors on the left side of each post,  please use my link (just click on the image for the store you want to use).  It will not affect your purchase in any way, but will provide me with a very small compensation for your order.  Some are affiliate links, some are not.  This is what helps me to be able to purchase new products to share with you!  Thank you!  It is very much appreciated.  

Thanks for stopping by and have an amazing day!

Jeanne
A Stroke of Jeanne-ius
Never Stop Creating

Supplies:

 Floribunda Rose Die Set

Through The Garden Gate Sentiments

DOM-JUL21 (Mini Slimline Envelope and Nested Card Creator Die Set)

Copic Markers

Hot Glue Gun

Hot Glue Sticks 

Paper Sculpting  Kit

Bearly Art Liquid Glue

Easy Glide Adhesive Tape Runner

Glue Dots

Platinum 6 Die Cutting Machine

Detail Pro Shears

Misti

Versafine Clair Nocturne Ink 

Ribbon, cardstock, and dots from stash 

Monday, April 11, 2022

Multi-Purpose Stamp Set - Two Examples

 I really love this stamp set from Honey Bee Stamps.  It is called In Full Bloom and I am sad to say, is retiring!  But, as of this writing it is still available and at and incredibly marked down price!  So if you are looking for a stamp and die to be used on ANY occasion card, this one is for you!

I have created two examples for this post.  One a Birthday Card and the other a Mother's Day Card.  (All supplies used are listed below)


First I created the Happy Birthday card.  I started with a white base card to which I adhered a purple mat which measured 4 x 5.25.  Then I stamped the image onto a piece of white X-press it card stock.  This is the only paper I use to color with copic markers.  I colored in the flowers and leaves using copic markers.  This was cut out using the matching die and then centered and adhered to the card.  Next, I used my Glimmer Hot Foil System and foiled the Happy Birthday sentiment using the Elegant Occasion Sentiments and Fuchsia Flower foil.   This piece was also cut out using the matching die and popped up and placed over the first part of the stamp. 


For my second card, I created it much the same way, just changing color schemes.  I again started with a white base card.  I then cut a piece of pink cardstock to 4 x 5.25 to be a mat,   but first embossed it using the Taylored Expressions Ikat embossing folder.  This was then adhered to the card front.  After that I again stamped the image and colored with copic markers, only this time in pinks.  It was then cut out using the matching die and attached to the center of the card.  Then using one of my favorite stamps from my stash, I stamped Happy Mother's Day onto some white cardstock using Versa Fine Claire, Nocturne Ink.  This was also cut out using the matching die and popped up over the center section of the stamped image using foam squares.


I hope you like how these cards turned out, I know I do!  You can change colors and sentiments to fit any of your card making needs.  This stamp set is so versatile and although the set comes with flower type sentiments, you can easily add your own as shown above.  

If  you click on SOME of the links in the blog or purchase from any of the vendors on the left side of each post,  please use my link (just click on the image for the store you want to use).  It will not affect your purchase in any way, but will provide me with a very small compensation for your order.  Some are affiliate links, some are not.  This is what helps me to be able to purchase new products to share with you!  Thank you!  It is very much appreciated.  

Thanks for stopping by and have an amazing day!

Jeanne
A Stroke of Jeanne-ius
Never Stop Creating

Supplies:

Cardstock and Mother's Day stamp from stash

Monday, April 4, 2022

Spellbinders Die of the Month for April 2022 - Gift Border and Sentiments

 This time I am featuring a card I made using the Spellbinders Die of the Month for April 2022.  I decided to do a mini slimline card which I rarely make, but really liked the look of it and may make more in the future!  You can check out all of Spellbinders monthly club kits here.  All the supplies I used will be posted at the end of this post.  


I started out by cutting a piece of white cardstock to 6 x 7 inches and then when folded created a 6 x 3.5" card.  To this I added a slightly smaller mat of white cardstock which was embossed using the Diamond Plaid Embossing Folder. 


The packages and sentiment were created with Yupo cardstock, Alcohol Inks, and an Ink Blower to create the beautiful multi-colored effect.  They were then Die cut using the outline only from the die set.  I then used white cardstock and the outline and detail die to cut out the white outlines.  The sentiment and bows were also cut from the Yupo Paper. 

The white outlines were attached to the colorful packages piece and popped up on the front of the card.  

I really like the colorful look of this card and hope you do too!

If  you click on SOME of the links in the blog or purchase from any of the vendors on the left side of each post,  please use my link (just click on the image for the store you want to use).  It will not affect your purchase in any way, but will provide me with a very small compensation for your order.  Some are affiliate links, some are not.  This is what helps me to be able to purchase new products to share with you!  Thank you!  It is very much appreciated.  

Thanks for stopping by and have an amazing day!

Jeanne
A Stroke of Jeanne-ius
Never Stop Creating

Supplies:

DOM-APR22 - Gift Border & Sentiments

Diamond Plaid Embossing Folder

Alcohol Inks (pool, patina, pink sherbet, flamingo, amethyst, and sunshine yellow)

Alcohol Ink Air Blower

Yupo Cardstock 5x7

Easy Glide Adhesive Tape Runner

Bearly Art Liquid Glue

Paper Trimmer

Platinum 6 Die Cutting and Embossing Machine

Foam Squares. 

Mini Slimline envelopes

Cardstock from my stash

Sunday, April 3, 2022

Spellbinder's Clear Stamp and Die of the Month for April 2022

 This month's Clear Stamp and Die of the month from Spellbinders is this really nice birthday set.  We always need to have birthday cards available and this would make cards for both feminine and masculine recipients.  I have created a card using both for this post and all the supplies I used are listed at the end of this post.  You can view it here:


This was a very fun card to create!  I started by stamping and coloring the packages with my copic markers.  I then cut them out with the included die.  The bows were also stamped  and then I fussy cut them out to attach to the packages leaving them and the ribbons white.  I cut a mat from dark blue cardstock that was 5.25 x 4 inches.  Then I cut a white piece of cardstock to measure 4.75 x 5 inches and die cut the Elegant Oval Twist die into the white to make a background oval.  The packages were popped up using foam squares and them attached to the front of the card. I stamped the sentiment from the same set onto white cardstock and then cut it out.  It was attached to a mat of the dark blue color and also popped up.  As a final touch, I added 3 glitter gems in blue to the front.  This completed the look. 

I hope you like like it.  As you can see, it can be made from any color combinations you choose.  

If  you click on SOME of the links in the blog or purchase from any of the vendors on the left side of each post,  please use my link (just click on the image for the store you want to use).  It will not affect your purchase in any way, but will provide me with a very small compensation for your order.  Some are affiliate links, some are not.  This is what helps me to be able to purchase new products to share with you!  Thank you!  It is very much appreciated.  

Thanks for stopping by and have an amazing day!

Jeanne
A Stroke of Jeanne-ius
Never Stop Creating

Supplies:

CDOM-APR22 Happy Moments 

Elegant Twist Ovals Etched Dies (from Stash)

Copic Markers (R39, R46, V15, V17, YR04, YR09, Y08, Y19, YG09, YG05, B24, B28

Versa Clair Nocturne Ink Pad

A2 Card Base

Platinum 6 die cutting machine

Paper Trimmer 

Foam Squares

Easy Glide Adhesive Tape Runner

Bearly Art Glue

Cardstock and Glitter Gems from my stash


Saturday, April 2, 2022

Spellbinder's Amazing Paper Grace Die of the Month for April 2022

If you haven't yet seen the APG of the month from Spellbinder's yet you must check it out!  It is another fabulous design from Becca Feeken and is called the Pop Up 3D Vignette Watering Can Bouquet!  You can view the APG of the month Club here .  To view all the club kits, just click here   All supplies used are listed at the end of this post. 


The first project I tackled was to create the 3-d watering can vignette.  I started by cutting the pieces of the can from brushed silver paper and embossed the design onto the can.  I then cut out several of the flowers from cardstock from my stash.  The centers of the flowers were shaded with distress ink Spiced Marmalade, and the leaves were tipped with Mowed Lawn distress ink.  The petals were shaded using copic marker color C3.  The can was assembled and glued together as designed.  I added a separate flower at the bottom of the can for added interest.  I then used Silver foil and the Everyday Sentiments  II glimmer plate to create the sentiment which was cut out and attached to the front of the can with foam squares.  Here is the finished project:


I also wanted to use the watering can to create a card.  Because of the size of the can die, I had to make a 5 x 7 inch card.  I started by cutting out just the front of the can, spout, and handle.  I assembled the pieces and then shaded the can with copic markers.  I wanted it to look like an old rusty watering can, so using my copics, I colored in some rust spots.  

I then made some flowers the same as I did for the watering can above, however I did not shade the leaves or the petals, just the flower centers.  I clumped them together in the bottom right of the card and added some clear dots from my stash to look like water trickling from the spout onto the flowers. 

Finally I used some Black Foil and foiled the sentiment from the Celebrate You Glimmer Sentiment plates onto white cardstock.  It was then cut out and glued onto the front of the card.  The watering can and some of the flower blossoms were popped up using foam squares.  Here is the finished card:


I hope you enjoyed these two projects and will give the Amazing Paper Grace of the Month Kit a try.  I am sure you will love it! 

If  you click on SOME of the links in the blog or purchase from any of the vendors on the left side of each post,  please use my link (just click on the image for the store you want to use).  It will not affect your purchase in any way, but will provide me with a very small compensation for your order.  Some are affiliate links, some are not.  This is what helps me to be able to purchase new products to share with you!  Thank you!  It is very much appreciated.  

Thanks for stopping by and have an amazing day!

Jeanne
A Stroke of Jeanne-ius
Never Stop Creating

Supplies

DOMAPG - APR22 Pop Up 3d Vignette Watering Can Bouquet

Everyday Sentiments II Glimmer Plates

Celebrate You Glimmer Sentiments

Black Foil

Silver Foil

Glimmer Hot Foil System

Platinum 6 Die Cutting Machine

Copic Markers  (E50, E53, E49, E59, E19 and C3, C2, C1, 0)

Mowed Lawn Distress Ink

Spiced Marmalade Distress Ink 

Paper Trimmer

5 x 7 base card

Detail Pro Shears

Double Sided Tape

Bearly Art Liquid Glue

Easy Glide Adhesive Tape

Foam Squares

Brushed Silver Cardstock

Printed cardstock, white, pink, green, and yellow cardstock from stash along with clear dots.


Friday, April 1, 2022

Spellbinders Kit of the Month for April 2022

 Another month has passed already, but now it is April 1 and Spellbinder's has released it's new club kits for April 2022.  Today I am featuring the Card Kit of the Month.  I have decided to show all the cards/projects for each kit I do in one blog post.  This month I created 5 cards from this kit.  It is jam packed with items to create so much more!  

 Here is all the information you need to know about all of Spellbinder's Clubs and Kits.  Now onto the cards....


 I hope you enjoyed these cards!  Which one was your favorite?  Let me know in the comments below. 

If  you click on SOME of the links in the blog or purchase from any of the vendors on the left side of each post,  please use my link (just click on the image for the store you want to use).  It will not affect your purchase in any way, but will provide me with a very small compensation for your order.  Some are affiliate links, some are not.  This is what helps me to be able to purchase new products to share with you!  Thank you!  It is very much appreciated.  

Thanks for stopping by and have an amazing day!

Jeanne
A Stroke of Jeanne-ius
Never Stop Creating

Supplies:

KOM-APR2022 - Picket Fences

Platinum 6 die cutting machine

Detail Pro Shears

Paper Trimmer

Misti Stamping Platform

Bearly Art Liquid Glue

Easy Glide Adhesive Runner

Circle Dies from stash (used for the second card)