Monday, October 24, 2022

Spellbinders New Release - Sealed by Spellbinders Collection

 Today I am thrilled to be sharing with you four products from the new release over at Spellbinders.  I am sure you will love it!  It is called Sealed by Spellbinders Collection and features a 2 pages of new and unique products.  I am showing off the Geometric Diamond Background glimmer plate and matching stencil along with the Sealed birds, and Sealed glimmer sentiments.  I hope you like what I have to show you!  All the products used are listed below at the end of this post.


The first card I created was the birthday card created in blues and gold foiling.  I cut out the bird die from x-press it blending cardstock and colored it with my copic markers.  I also added some details to the birds with the markers.  

I then took a piece of white cardstock and foiled the background plate onto it using gold foil.  This was then placed on a blue mat which is slightly smaller than the size of the card.  I then glued the birds and branch across the top of the glimmered area and the popped up a glimmer sentiment with foam squares. 


For this second card, I thought it would be perfect for a fall card.  I first glimmered the background using copper foil. Then I colored it it using the coordinating stencil and some different shades of orange ink.  It was then placed onto a mat background of copper glitter paper.  The Fall Label Motif die set was then used to create the center arch which was made from copper metallic paper and more of the glitter paper  I then cut three of the pumpkins from the set and two of the acorns.  They were then inked around the edges using some vintage photo distress ink.  They were then glued across the bottom of the card and the center one was popped up using foam squares  The sentiment was cut from the September 22 die of the month .


The third card was created in much the same way as the first two.  I glimmered the background onto white cardstock and colored it in with pretty blue green inks using the coordinating stencil.  I left the smallest diamonds uncolored because I really liked the look.  I then mounted it on some matching green blue cardstock and placed it onto the card front.  The oval was cut using the Essential Ovals die set and placed in the top center of the card.  I did the birds and branches the same as I did for the first card and glued them to the oval. I trimmed some of the branch which overhung the oval.  The sentiment was then also glimmered with old ink using the Sealed glimmer sentiments and gold foil. It was cut and framed onto another piece of the background cardstock and popped up on the bottom with foam squares.  As a final touch I found these really pretty gems which matched perfectly and added them to the cardfront. 


Which one is your favorite?  I would have to say mine is the last one.  I love the colors and how everything came together so well.  Let me know what you think in the comments below.  I would love to hear from you!

If  you click on SOME of the links in the blog or purchase from any of the vendors on the right side of each post,  please use my link (just click on the image for the store you want to use).  It will not affect your purchase in any way, but will provide me with a very small compensation for your order.  Some are affiliate links, some are not.  This is what helps me to be able to purchase new products to share with you!  Thank you!  It is very much appreciated.  

Thanks for stopping by and have an amazing day!

Jeanne
A Stroke of Jeanne-ius
Never Stop Creating

Supplies:

Geometric Diamond Glimmer Plate (new)

Layered Geometric Diamond Stencil (new)

Sealed Birds Die Set (new)

Sealed Glimmer Sentiments (new)

Essential Ovals dies

Fall Label Motif

DOM-SEPT22 - Stitched Fall Leaves Die of the month

Gold Foil

Copper Foil

Copic Markers

X-press it Blending Cardstock 

Vintage Photo Distress Ink

Ink Dauber

 Glimmer Hot Foil System

Platinum 6 Die Cutting Machine

Easy Glide Adhesive Tape Runner

Bearly Art Liquid Glue

Small Foam Squares

Medium Foam Sqares

Paper Trimmer

Detail Tweezers

Detail Scissors

A2 Card Base

Best Ever Craft Tape

Glitter paper, metallic paper, colored cardstock, Birthday sentiment, various ink colors and gems all from my stash 


Thursday, October 20, 2022

Happy Halloween Shaker Card - Kat Scrapiness

 Today I am showing off this really cute Halloween card I created using products from Kat Scrapiness. I love how this came out and the little shaker bits make an  awesome addition!  I hope you like it too!


To create this adorable card I started with an A2 white card base.  I added  a   piece of colorful striped paper from the Creepy & Kooky paper pack.  This was cut slightly smaller so that I had a white frame around the card.  I tried to match the cardstock to the green stripe in the paper which I think I came pretty close.  The sentiment was cut from this green paper using the Spooky Halloween Die.  I then created the shaker portion of the card by using the Jack-o-Lantern/pumpkin Shaker Die.  I used the Groovy Ghouls Sprinkle  mix and the Halloween Night Sequin mix to the shaker for some fun.  Both sets are really cute as you can see from the photo below.  


I glued the facial features onto the front of the acetate and added some highlight lines with a white gel pen.  

I felt the card still needed something so I decided to add a little ghost wearing a bow tie to the lower right side of the card.  This was cut from Boo-gy Ghost Die set as was the bow tie.  For a final touch I decided to add the moon and bat to the upper right corner of the card.  For these two pieces Were cut  from the Crafters Essentials Halloween Dies.  

This completed this easy and fun Halloween Card.  I think anyone would be glad to receive it as it is a more fun card than a spooky one.  It would be great for kids, because of the shaker element, but I am sure adults would like it too!  Please be sure to check out Kat Scrappiness for all your card making needs!

If  you click on SOME of the links in the blog or purchase from any of the vendors on the right side of each post,  please use my link (just click on the image for the store you want to use).  It will not affect your purchase in any way, but will provide me with a very small compensation for your order.  Some are affiliate links, some are not.  This is what helps me to be able to purchase new products to share with you!  Thank you!  It is very much appreciated.  

Thanks for stopping by and have an amazing day!

Jeanne
A Stroke of Jeanne-ius
Never Stop Creating


Wednesday, October 19, 2022

Easy Thanksgiving card using only 3 products from Kat Scrappiness

 As many of you have heard, I recently purchased a Brother Scan and Cut.  While playing with it, I decided to see if it would cut out the images from some of the papers in my Gobble Gobble paper pad from Kat Scrappiness.  I am very happy to say it did a beautiful job.  If you do not have a scan and cut, you can easily just fussy cut these items out with a pair of detail scissors.  By just using the stamp and die set for the sentiment and 5 different sheets of the paper pad (two for the mat and background and 3 for the cutouts), I was able to create this fun and simple Thanksgiving card.


So sorry for the glare, there is a better photo of the card below.

To create this card, I started with a white A2 size card base and added a  sheet of teal gingham paper from the Gobble Gobble paper pad as a mat and then added a slightly smaller sheet of the same color polka dot paper for the background piece.  I used three separate pieces of this paper pad to cut out the items on my card, The pumpkin paper, the turnkey paper and the leaf paper.  As I said these can easily be cut using a pair of detail scissors. 

I chose three of the turkeys and pumpkins as shown then added two leaves to each of the pumpkins in opposite colors.  I wanted to use a teal pumpkin and teal leaves to keep my color scheme.  These were all glued in pace with liquid glue.  

Finally, I stamped the sentiment onto white cardstock with Black Ink using the Gobble Gobble stamp set and die cut it out using the matching Gobble Gobble Die set.  This was net mounted onto a piece of teal cardstock and popped up using foam squares to the center of the card. 

That is it!  Easy as pie!  A cute Thanksgiving card using a minimum of supplies.  I  hope you enjoy it and will give it a try for yourself!  Here is a photo of the finished card.


Be sure to stop by Kat Scrappiness for all your card making needs!

If  you click on SOME of the links in the blog or purchase from any of the vendors on the right side of each post,  please use my link (just click on the image for the store you want to use).  It will not affect your purchase in any way, but will provide me with a very small compensation for your order.  Some are affiliate links, some are not.  This is what helps me to be able to purchase new products to share with you!  Thank you!  It is very much appreciated.  

Thanks for stopping by and have an amazing day!

Jeanne
A Stroke of Jeanne-ius
Never Stop Creating

Sunday, October 16, 2022

3D Vignette Collection by Becca Feeken - Twin Lens Camera

 Today I am featuring three different projects using the new 3D vignette Twin Lens Camera die set from Becca Feeken.  This set can be used for both a 3D project or 5x7 cards as I have showed in my examples.  The camera features pockets that hold4 different cards on which you can mount photos for a cute display and storage.  I am sure you will love this whole collection.!  As usual, I have listed all the products used to create these projects at the end of this post.  


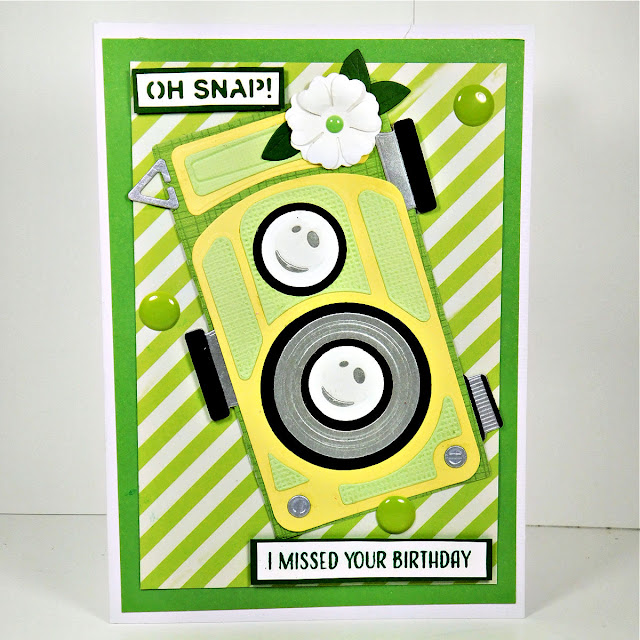
For the first card I decided to create a fun belated birthday card.  I love how the sentiments make for a fun kind of play on words.  The top sentiment comes with the set and the bottom sentiment was from the Birthday Unboxing set.  I used some pretty yellow and green papers along with black and brushed silver making just the front part of the camera.  I then added the flower which also comes with this die set.  The green enamel dots were from my stash and both sentiments were popped up onto foam squares. 


For the next project, I decided to create a 3D camera which I did from different black and grey colored cardstock. It really looks like a box camera!  I just love how it turned out.  I decided to add a pink flower to this camera with a pearl from my stash in the center.  


For the third and final card, I also decided to create another fun birthday card.  I I used fun colorful polka dot paper for a background paper.  I added some pretty blue cardstock along with more brushed silver accents.  I also added several different multicolored flowers to the camera at both the top and bottom corners.  I used some of the flowers from the petite floral Potpourri die set for this card to add some different sizes of blossoms.  The sentiments also came from both the set and the Birthday Unboxing set and were popped up on foam squares.  


This camera set was so fun to play with and created some great cards and project.  I hope you will check out this whole collection as there are some really cute die sets in it.  And as always, you know Becca Feeken always hits a home run when she designs something!

If  you click on SOME of the links in the blog or purchase from any of the vendors on the right side of each post,  please use my link (just click on the image for the store you want to use).  It will not affect your purchase in any way, but will provide me with a very small compensation for your order.  Some are affiliate links, some are not.  This is what helps me to be able to purchase new products to share with you!  Thank you!  It is very much appreciated.  

Thanks for stopping by and have an amazing day!

Jeanne
A Stroke of Jeanne-ius
Never Stop Creating


Supplies:

3D Vignette Twin Lens Camera Die Set (new)

Birthday Unboxing Sentiments

Petite Floral Potpourri Die Set

Brushed Silver Cardstock 

 Platinum 6 Die Cutting Machine

Easy Glide Adhesive Tape Runner

Bearly Art Liquid Glue

Small Foam Squares

Medium Foam Sqares

Paper Trimmer

Detail Tweezers

Detail Scissors

5 x 7 Card Base

Best Ever Craft Tape

cardstock, printed papers, pearls, enamel drops and inks were all from my stash.


Saturday, October 15, 2022

Becca Feekens,, 3D Vignette Collection - Pet House Die Set

 Today I am featuring one of Becca Feeken's latest releases the Pet House 3D Vignette.  This die set creates the cutest pet house.  Whether you are a cat or dog lover, it doesn't matter because this set will suit either one!  You can also make a simple card if you prefer it to something 3D.  As always, I have listed a complete supply list at the end of this post.  Today I have two creations to show you that you can create either a 3D piece or a greeting card with this die set.  


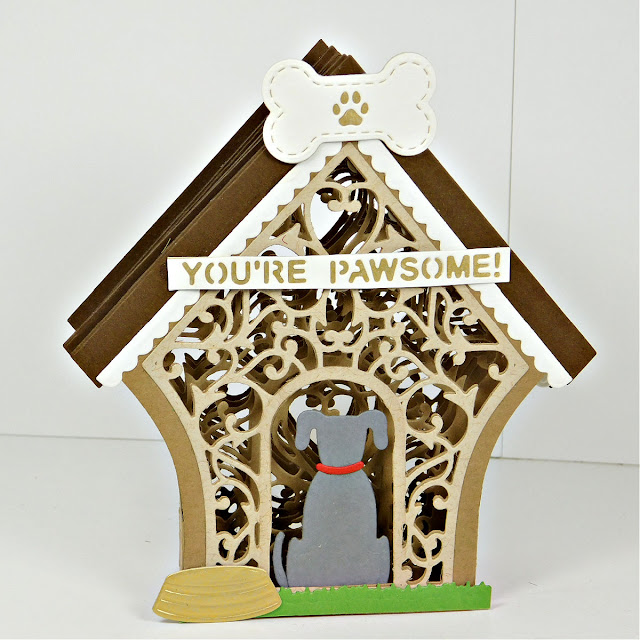
For the Dog lovers,  the first project I chose to create  as designed and created a  dog house from brown and tan cardstocks.  The sentiment, paw print on the bone and dog dish were all cut from mirrored gold cardstock.  For the paw print on the bone and the sentiment they were then covered with an off white piece to set off the gold. I decided to place a gray dog just inside the doghouse and green grass below.  And remember, it does fold flat to fit into an A2 size envelope.  


For the second project, I decided to make an A2 size card and this time I chose to make a kitty house instead of a dog house.  I simply cut all the elements from pinks and white to create a soft pretty card.  The cart is white with a pink collar.  I used the You're Purrfect sentiment and the paw print to decorate the front of the house.  A cute card for any cat lover!


Which are you a dog lover or a cat lover or even both?  It doesn't matter because this set will create both animal houses and animals that will surely make anyone smile!  Be sure to stop back tomorrow when I will have another 3D set of projects for you to check out!

If  you click on SOME of the links in the blog or purchase from any of the vendors on the right side of each post,  please use my link (just click on the image for the store you want to use).  It will not affect your purchase in any way, but will provide me with a very small compensation for your order.  Some are affiliate links, some are not.  This is what helps me to be able to purchase new products to share with you!  Thank you!  It is very much appreciated.  

Thanks for stopping by and have an amazing day!

Jeanne
A Stroke of Jeanne-ius
Never Stop Creating


Supplies:

3D Vignette Dog House By Becca Feeken (new)

Brushed Gold Cardstock 

Platinum 6 Die Cutting Machine

Easy Glide Adhesive Tape Runner

Bearly Art Liquid Glue

Small Foam Squares

Medium Foam Sqares

Paper Trimmer

Detail Tweezers

Detail Scissors

A2 Card Base

Best Ever Craft Tape

Printed papers and card stock from my stash.


Friday, October 14, 2022

Tiered Tray by Becky Roberts - Day one of Spellbinders New Releases

 Today I am featuring one of the many new releases over at Spellbinders.  The first one I am showing is the new Tiered Tray Collection from Becky Roberts.  This set is simply adorable!  I have one of these tiered trays in real life and they are really fun to fill up and decorate!  As usual I have listed all the  products used at the end of this post.  Be sure to check all the photos, as I have included one of my tiered tray!


All cards started with an A2 card base, followed by a base of solid color and a background of printed paper.  For this first card, I cut the tray from tan paper and inked the edges with distress ink.  I then cut various other pieces from the decor die set and inked some of the edges and arranged them in the tray as shown.  I added mirrored gold feet and handle and glued everything down.  The sentiment was stamped onto white paper with black ink and attached to the center of the card using foam squares.  


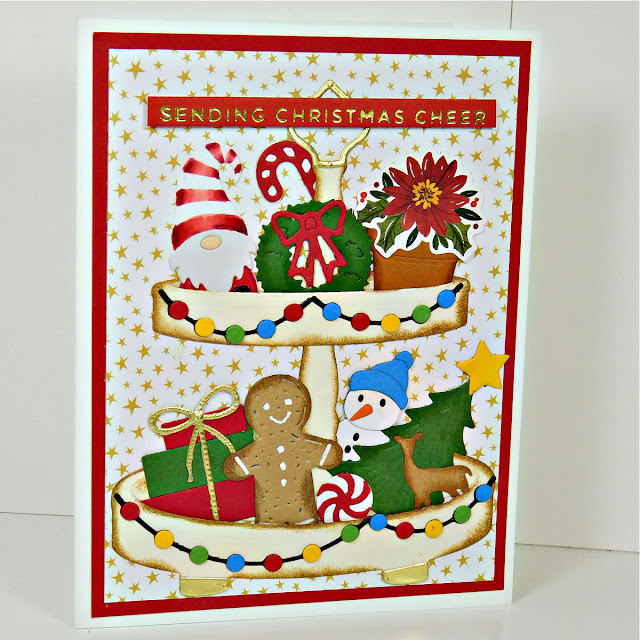
This second card literally took me all day!  I went thru every spellbinders Christmas die set and found various elements from each to fill my trays.  I even found a sticker to fill the flower pot.  Some of the edges were inked with Distress Ink  and some were not.  I added some white details to the gingerbread man using a white gel pen.  The tray itself was cut from cream colored cardstock and inked with Distress Ink.  I added Mirror Gold feet and handle and foiled the sentiment onto red paper using gold foil and it too was  popped up with foam squares..  I really LOVE this card.  It came out better than expected!  I think it is my favorite of the three!


This was the final card of the three I made for this release.  I decided to go with a black and white design on this card.  The tray was cut from black cardstock with Mirror Silver feet and Handle.  The Items were cut and inked and assembled, then arranged into the tray.  The sentiment was stamped on white paper using black ink and mounted on a red piece of cardstock to frame it and make it stand out. 

Please not that the pile of books shown in two of the photos were detailed using a fine black marker.  


Here is a photo of my personal tiered tray that is decorated to match my room.  This is my room where my neighbor and I play cards during the winter months when it is too cold to sit outside.  


I just love this new release and know you will too!  There are so many ways you can use it, it is all up to your imagination.  Be sure to check back tomorrow when I will have another new release from Spellbinders!

If  you click on SOME of the links in the blog or purchase from any of the vendors on the right side of each post,  please use my link (just click on the image for the store you want to use).  It will not affect your purchase in any way, but will provide me with a very small compensation for your order.  Some are affiliate links, some are not.  This is what helps me to be able to purchase new products to share with you!  Thank you!  It is very much appreciated.  

Thanks for stopping by and have an amazing day!

Jeanne
A Stroke of Jeanne-ius
Never Stop Creating


Supplies:

Tiered Tray Die set (new)

Tiered Tray Decor Dies (new)

Tiered Tray Sentiments (New)

Glitter Wishes Foiling Plate

Parcel & Post Christmas Decoration Dies (candy cane and peppermint)

Santa Lane Card Kit Dies (Snowman)

Gnome Tree Dies (string lights, wreath, and star)

Shopping Spree dies (presents)

Charming Cottage Dies (gingerbread man and tree)

Distress Inks:

     Vintage Photo

     Mowed Lawn

     Fossilized Amber

     Spiced Marmalade

     Ripe Persimmon

Silver Mirrored Paper

White Gel Pen

Fine Line Black Marker

Gold Foil

 Glimmer Hot Foil System

Mirror Gold Cardstock 

Platinum 6 Die Cutting Machine

Easy Glide Adhesive Tape Runner

Bearly Art Liquid Glue

Small Foam Squares

Medium Foam Sqares

Paper Trimmer

Detail Tweezers

Detail Scissors

Versafine Claire Nocturne Ink 

A2 Card Base

Best Ever Craft Tape

Poinsettia sticker, cardstock, bow on wreath, small deer, and printed papers from my stash

Thursday, October 13, 2022

Winter Woodland Stamps and Coordinating Dies from Simon Hurley and Spellbinders

 Today I am honored to show off three card examples using the new Simon Hurley  Winter Woodland Stamp and Die set. It too is part of his Joyful Christmas Collection.   I featured several beautiful stamps and sentiments. I am sure you will find this an excellent choice to add to your Christmas card making Stash.  As usual all the products used are listed at the end of this post.


For all three cards, I stamped the images onto X-press It blending cardstock which is the only paper I use when copic coloring.  They were stamped using Momento Tuxedo Black ink and as I said colored with Copic markers.  They were then all cut out using the coordinating die sets.  

For the first card I started with an A2 size card base and cut a slightly smaller piece of green cardstock for the mat.  I then found this pretty plaid printed paper to which I used the Essential Ovals to cut out.  I attached my bird and branch to the center of the oval and popped up the oval using foam squares.  For the sentiment, I chose one from the set and stamped onto white cardstock with Versafine Clair Nocturne black ink.  It was then adhered to the oval as shown.  


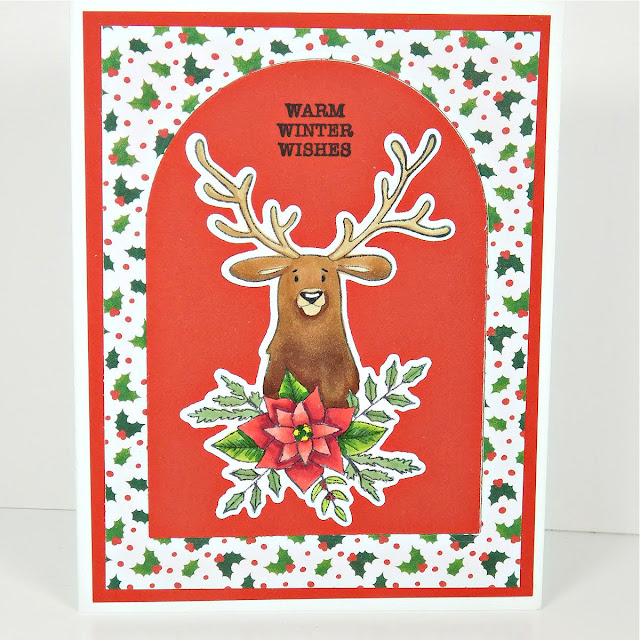
For the second card, I also used and A2 base card.  It was then matted by cutting red cardstock slightly smaller than the card front.  I then adhered this pretty holly themed printed paper to the red and cut it out using the Essential Arches.  I turned over the cutout piece to make the arch appear red.  The image was then attached to the arch and the sentiment, also from this set, was stamped in black ink directly onto the arch.  


The final card of the three was a little more time consuming than the first two.  I used the polar bear images and one small gift from the set and colored each with copic markers.  I then cut the Let it Snowman A2 card front die from brushed silver.  The background snowflake printed paper was cut the same size as the front  of the card.  I then cut the inside of the card front die using blue glitter paper and added snow with white glitter paper.  I also decided that it needed a tree and chose the die from the DOM-OCT22.  It was cut from Green cardstock and adhered behind the snowman.  Finally I cut three snowflakes from more glitter paper and glued them to the background.

As I finishing touch, I added the sentiment from the Halftone Holiday set that I featured yesterday, stamped it with black ink. I then heat embossed with clear embossing powder to make it pop a bit more.  


I am sure that you will love this stamp and die bundle as much as I do.  It offers so many cardmaking possibilities!  I hope you find one of the above cards to inspire you into creating one of your own!  To see Simon's complete collection, simply click here.

If  you click on SOME of the links in the blog or purchase from any of the vendors on the right side of each post,  please use my link (just click on the image for the store you want to use).  It will not affect your purchase in any way, but will provide me with a very small compensation for your order.  Some are affiliate links, some are not.  This is what helps me to be able to purchase new products to share with you!  Thank you!  It is very much appreciated.  

Thanks for stopping by and have an amazing day!

Jeanne
A Stroke of Jeanne-ius
Never Stop Creating


Supplies:

Winter Woodland Stamp and Die Set

KOM-OCT22 dies 

Let it Snowman AA2 Card Front Die

Essential Arches Dies

Essential Oval Dies 

X-press it blending cardstock

Copic Markers

Momentum Tuxedo Black Ink Pad 

White gel pen

Clear Embossing Powder

Heat Gun 

Brushed Silver Cardstock 

Clear pigment ink

Platinum 6 Die Cutting Machine

Easy Glide Adhesive Tape Runner

Bearly Art Liquid Glue

Small Foam Squares

Medium Foam Sqares

Paper Trimmer

Detail Tweezers

Detail Scissors

Versafine Claire Nocturne Ink 

A2 Card Base

Best Ever Craft Tape


Wednesday, October 12, 2022

Joyful Christmas Collection by Simon Hurley - Halftone Holiday Stamp an Dies

 Today it is my pleasure to show you two of my projects using the new Halftone Holiday stamp and die set from the Joyful Christmas Collection by Simon Hurley.  These two cards were so much fun to create.  I colored all the elements last evening and put together the cards this morning.  As usual all of the products used are listed below this post.  


For the first card I started with an A2 card base.  I then added a mat of red metallic cardstock followed by a pretty green and red striped holiday paper from my stash.  I then stamped and colored several of the images from the stamp set onto X-press  it card stock and colored them with my copic marker.  I tried to follow the shading on the stamp as closely as possible to get the proper coloration I was looking for.  

I then arranged the poinsettia, holly leaves, and pine cones into a cluster on t he front of the card.  The poinsettia was popped up using foam squares.  The sentiment was stamped with clear pigment ink and heat embossed with red embossing powder, also from my stash.  It was then framed using the same red metallic paper and popped up underneath the floral arrangement on the card front. 

For the final embellishment, I found some really pretty red gems which I attached around the floral arrangement on the front of the card.  I also had enough of the printed paper to cover the flap on an envelope so that it matched the card. 


For the second card, I also started with an A2 card base to which I added a piece of red plaid cardstock.  It was cut so that when glued on the front of the card, it would leave a small white vorder.  I then stamped some more of the images onto Xpress-It cardstock and colored using my copic markers.  They were then arranged on the front of the card as shown.  


For the sentiment I stamped it onto white cardstock using clear pigment ink and also embossed with red embossing powder.  This was then popped up onto the front of the card as shown below.


I am sorry that this post is a little late.  These items were released on Spellbinders Website on October 5th, however, I just received them yesterday.  So I quickly whipped up these two cards to show off this beautiful set.  I am sure you will have many wonderful ideas for using this stamp and die set!  Check out the whole collection here. 

I will be back tomorrow with another sample of card/s from another of Simon's fabulous new stamp sets from this collection.  Be sure to check back.  You won't want to miss it!

If  you click on SOME of the links in the blog or purchase from any of the vendors on the right side of each post,  please use my link (just click on the image for the store you want to use).  It will not affect your purchase in any way, but will provide me with a very small compensation for your order.  Some are affiliate links, some are not.  This is what helps me to be able to purchase new products to share with you!  Thank you!  It is very much appreciated.  

Thanks for stopping by and have an amazing day!

Jeanne
A Stroke of Jeanne-ius
Never Stop Creating


Supplies:

Halftone Holiday Stamp Set (new)

Halftone Holiday Stamp and  Die Set (new)

Red Foil Cardstock

Platinum 6 Die Cutting Machine

Easy Glide Adhesive Tape Runner

Bearly Art Liquid Glue

Small Foam Squares

Medium Foam Sqares

Paper Trimmer

Detail Tweezers

Detail Scissors

Momento Tuxedo Black Ink

Xpress-it Blending Cardstock 

Copic Sketch Markers

Heat Gun

A2 Card Base

Best Ever Craft Tape

Printed papers, gems, and red embossing powder from my stash.


Wednesday, October 5, 2022

Spellbinder new Release - Joyful Christmas Collection by Simon Hurley

 Spellbinders and Simon Hurley have teamed up to release this great new Christmas Collection!.  I am featuring three cards today using only part of this wonderful collection.  I have a glimmer plate, a background die, and a stag to share with you today.  Although, this set has many more products available.  Please feel free to check it out here.  As usual I have listed the complete list of products used at the end of this post.  


All three cards started with an A2 card base.  

The first card used mirror silver for the matt piece and the oval which was cut using the Essential Oval dies.  Then I cut a piece of blue cardstock which was slightly smaller than the mat piece and foiled it using my Glimmer Hot Foil System, prism foil, and the Geo Snowflakes glimmer plate.  This created an iridescent snowflake effect on the blue cardstock.  Once the oval was placed on top of the background piece, I then cut out the stag, glued him in place over the oval and added a strip of silver scalloped and glitter washi tape.  This added even more bling to the card.  I then die cut different greenery and poinsettias.  They were arranged and glued along the bottom of the oval.

I found the perfect sentiment from the Dancing Holiday Sentiments stamp set and stamped it onto white cardstock.  I then cut it out and popped  it up onto the card using foam squares.  As a final touch, I added some red gems from my stash.  Here is the finished card:


The second card was created using the Candy Striped Background Die.  I used another A2 card base to which I added a piece of white glitter paper to the front which was the same size as the card.  I then cut out two of the candy striped backgrounds, one in red and one in green.  The green one was glued on the right side of the piece and attached to the front of the card with the wrong side showing.  (You really can't tell  once the card is assembled, but it was the only way I could achieve the plaid look I was going for.).  Next, I placed glue on the wrong side of the red piece and attached it to the front of the card over the green piece.  This created the plaid look. 

Next I cut an elegant oval from white cardstock and glued to the center of the front of the card.  I then cut the stag and poinsettia from that die set and placed them atop the oval.  I wanted to place a bow around the stag's neck and I found a perfect on in the Charming Cottage die set.  It was cut from red cardstock and attached at the neck.  

For the sentiment, I chose to use the Holiday Sentiments 2 glimmer plates and gold foil.  The sentiment was then cut out using the matching die and trimmed to fit on the front of the card.  It was popped up with foam squares.  Here is a closer look at the second card:


For the third and final card, I decided to go with a Fall card.  I wanted to show that just because this is a Christmas Collection, that doesn't mean you can't stretch them to do more than that.  I started again with an A2 card base.  I then added the candy stripe background die using a dark orange color.  I then cut an orange Fluted classic oval and a smaller white essential oval to use as a guide for my wreath.  They were both adhered to the center of the card.  To create the wreath, I cut out 20 leaves from the Floral Stag die set and colored each of them with Copic Markers so  they looked like fall leaves.  They were then glued into place around the oval to give the look of a fall wreath. 

For the sentiment, I chose a light brown cardstock and cut the word FALL from the Be Bold Uppercase Alphabet and glued it to the center of the wreath.  Although it was rather time consuming coloring all those leaves, I think it made for a very pretty card.  Here is a close  up look at the third card:


I was able to come up with three totally different looks from just three items from this collection.  The possibilities are endless with the entire collection.  Please check it out!  You won't be disappointed!

If  you click on SOME of the links in the blog or purchase from any of the vendors on the right side of each post,  please use my link (just click on the image for the store you want to use).  It will not affect your purchase in any way, but will provide me with a very small compensation for your order.  Some are affiliate links, some are not.  This is what helps me to be able to purchase new products to share with you!  Thank you!  It is very much appreciated.  

Thanks for stopping by and have an amazing day!

Jeanne
A Stroke of Jeanne-ius
Never Stop Creating


Supplies:

Candy Stripe Background Die  (New)

Floral Stag Die Set (new)

Geo Snowflake Glimmer Plate (new)

Essential Ovals Dies

Fluted Classic Oval Dies

Be Bold Uppercase Alphabet

Holiday Sentiments 2 Glimmer Plates

Dancing Holiday Sentiments

Prism Foil

Gold Foil

Copic Markers 

E39, R43, YR04, Y18, YG01

 Glimmer Hot Foil Sys

Mirror Silver Cardstock

Platinum 6 Die Cutting Machine

Easy Glide Adhesive Tape Runner

Bearly Art Liquid Glue

Small Foam Squares

Medium Foam Sqares

Paper Trimmer

Detail Tweezers

Detail Scissors

Versafine Claire Nocturne Ink 

A2 Card Base (3)

Best Ever Craft Tape

Red gems, washi tape, and assorted cardstock all from my stash. 


Spellbinders Layered Stitched Diamonds Holiday Web Exclusive

 Spellbinders is launching two new collections today.  This first post features the Layered Stitched Diamond Holiday Stitches Web Exclusive. It is a beautiful die and stamp set that can be configured in so many different ways!  At the time I made this card, I only had the die, the stamps were not yet available, but they are now!  Both are limited quantities so if you like it order it now!  As always, I will have a list of all the products used at the end of this post.  


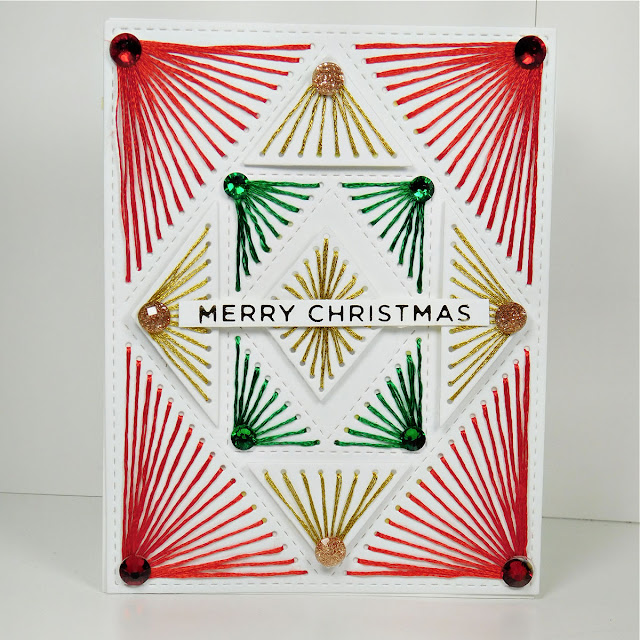
If you love stitched cards, or the look of stitching, you will love this set!.  I started this card with an A2 size base card.  I then cut a piece the same size as the front of the card and die cut it using the Layered Stitched Diamonds die.  I stitched it using red embroidery thread.  The the center sections, I embroidered those using green embroidery thread.  The raised portions and the center were done in gold embossing thread and popped up using foam squares. 

I then used my glimmer hot foil system and foiled the sentiment from the Holiday Sentiments Series 2 Glimmer Hot Foil set with gold foil, cut it out and placed it across the center of the card.  

As a final finishing touch, I added coordinating colored gems to each section of the card as shown.  It was a very quick and fun card to create.  I hope you like it and will give it a try.  Remember, there are limited quantities, so order yours now!


If  you click on SOME of the links in the blog or purchase from any of the vendors on the right side of each post,  please use my link (just click on the image for the store you want to use).  It will not affect your purchase in any way, but will provide me with a very small compensation for your order.  Some are affiliate links, some are not.  This is what helps me to be able to purchase new products to share with you!  Thank you!  It is very much appreciated.  

Thanks for stopping by and have an amazing day!

Jeanne
A Stroke of Jeanne-ius
Never Stop Creating


Supplies:

Layered Stitched Diamonds

Holiday Sentiments Series 2 Glimmer Hot Foil 

 Glimmer Hot Foil System

Gold Foil

Platinum 6 Die Cutting Machine

Easy Glide Adhesive Tape Runner

Bearly Art Liquid Glue

Small Foam Squares

Medium Foam Sqares

Paper Trimmer

Detail Tweezers

Detail Scissors

A2 Card Base

Best Ever Craft Tape

Embroider Thread, various colored gems, and sewing needle all from my stash.