Monday, July 25, 2022

Spellbinders New Release - Celebrate the Season

 It is still Christmas in July and today I am featuring the new release from Spellbinders called Celebrate the Season.  This collection has some beautiful items included for Christmas and Winter card making.  I have three different variations for you today.  All of the products used are listed at the end of this post!


The first card I am going to discuss is the one pictured on the far right.  I started with a white A2 base card and added a matt of lavender cardstock.  I then found some pretty background paper to match.  It was then mounted on top of the mat.  I cut out and assembled the sled from the Winter Sled Die Set.  I popped it up onto the card front with foam squares.  I then cut out and assembled the skates from the same set and glued them to the sled.  The sled was then adorned with a poinsettia, holly leaves, and sprigs all cut from the same die set.  For a sentiment, I chose to use the Glitter Wishes Foil Plates from the same collection with Lavender Petal Foil on white cardstock.  It was cut out using the enclosed die and then mounted on the same lavender cardstock that was used for the mat.  As a final touch, I added three lavender enamel dots from my stash.


For the center card, I used a design I had created earlier but added the Holiday Blooms to the card instead.  That is why it may look familiar to some of you.  So for this card I also started with an A2 card base.  To it, I added a red mat.  For the background I used a really pretty red and white striped glitter cardstock from  my stash.  This covered the lower portion of the background.  The top portion was cut and foiled onto white cardstock using gold foil.  It was then cut to fit on top of the striped cardstock and glued into place.  I then created the Christmas arrangement using the Holiday Blooms Die Set and raised up the poinsettia using foam squares.  


For the third and final card, I chose to use just the skates  from the Winter Welcome die set.  I started with a A2 card base onto which I placed a mat of red cardstock.  To that I added some shiny gold and white striped printed paper for the background.  The skates were cut pit and assembled and placed on a brushed gold cardstock piece cut from Candlewick Rectangles Die Set.  This was then adorned with some holly, berries, and sprigs using the Holiday Blooms die set. 

The sentiment was foiled onto white cardstock using the Glimmer Wishes glimmer plates from this collection along with gold foil.  It was then cut out and matted onto red cardstock and popped up on the front of the card using foam squares.


So that's it!  Three separate cards using this new collection!  I hope you find it as appealing as I did.  Check it out!  There is something for everyone!

 you click on SOME of the links in the blog or purchase from any of the vendors on the left side of each post,  please use my link (just click on the image for the store you want to use).  It will not affect your purchase in any way, but will provide me with a very small compensation for your order.  Some are affiliate links, some are not.  This is what helps me to be able to purchase new products to share with you!  Thank you!  It is very much appreciated.  

Thanks for stopping by and have an amazing day!

Jeanne
A Stroke of Jeanne-ius
Never Stop Creating

Supplies: 

Winter Welcome Sled Dies

Glitter Wishes Sentiments Glimmer Plate

Holiday Blooms Die Set

GOM-NOV21 Curved Christmas Glimmer Borders

Candlewick Rectangle Dies

Lavender Petal Foil

Gold Foil

Mirrored Silver Cardstock

Brushed Silver

Brushed  Gold Cardstock

 Glimmer Hot Foil System

Mirror Gold Cardstock 

Platinum 6 Die Cutting Machine

Easy Glide Adhesive Tape Runner

Bearly Art Liquid Glue

Small Foam Squares

Paper Trimmer

Detail Tweezers

A2 Card Base

Sunday, July 24, 2022

Spellbinders New Parcel & Post Collection - So Cute!

 I just love Spellbinders new Parcel & Post Collection!  It is so cute and appropriate for so many differernt occasions.  It can be used for Christmas, Birthday, and Valentines day to name a few.  I have created three examples to help inspire you to use this set!  I have listed all the supplies used at the end of this post!


I decided to create a Christmas card for my first example.  I started with an A2 card base and aded a piece of silver patterned background paper.  To that I cut a red mailbox from the Parcel and Post mailbox die and glimmered the front panel with silver foil and the All  Occasion Mailbox Greetings glimmer plate.  I filled the mailbox with flowers and greenery from the Christmas Blooms Die set.and some of the dies included with the mailbox set.  I also added some envelopes to my mailbox and addressed some to Santa using a fine line black marker pen.  


I just love how this second card turned out.  I again used an A2 card base and added a matt of light blue carstock.  To this I added a background of blue gingham cardstock.  I the cut a square from the Picot Petite Squares die from the same cardstock as the matt.  This was placed in the center of the card.  To this I popped up another square of white cardstock which was glimmered with gold foil using the All Occasion Mailbox Greetings and popped up in the center of the blue square.  Next the flowers and greenery were added in the colors shown using the dies from the Petite Floral Potpourri die set and the Parcel and Post Mailbox.  They were then glued and arranged on opposite corners of the square.  This makes a beautiful Birthday card!  I love the colors I used in this card.  I think it turned out so pretty!


For the final card, I started again with an A2 card base.  I added a matt of red cardstock and embossed a piece of white cardstock using the Diamond Plaid Embossing Folder which I used as a background die.  To this I cut a blue mailbox using the Parcel and Post Die Set For the front of the box, I glimmered using gold foil and the All Occasion Mailbox Greetings Glimmer Plates.  The flowers were using the floral dies included in the Parcel & Post mailbox die set.  They were arranged to look as though they were coming out of the mailbox along with a small white envelope sealed with a small red hear from the Parcel and Post Heart Deco die set.  Then I added the word "love" using red cardstock and one of the hearts from the same Heart Deco die set to complete this card.  


This card would be perfect for Valentine's day, or just a fun friendship card.  


So here are three very different examples from this collection.  To see the entire collection, just click here.  I hope you like them and will give them a try for yourself!


If  you click on SOME of the links in the blog or purchase from any of the vendors on the left side of each post,  please use my link (just click on the image for the store you want to use).  It will not affect your purchase in any way, but will provide me with a very small compensation for your order.  Some are affiliate links, some are not.  This is what helps me to be able to purchase new products to share with you!  Thank you!  It is very much appreciated.  

Thanks for stopping by and have an amazing day!

Jeanne
A Stroke of Jeanne-ius
Never Stop Creating

Supplies: 


Parcel & Post Mailbox

All Occasion Mailbox Greetings Glimmer Plates

Parcel & Post Heart Decoration dies

Petite Floral Potpourri

Petite Picot Squares

Diamond Plaid Embossing Folder

Christmas Blooms Die Set

Silver Foil

Gold Foil

 Glimmer Hot Foil System

Platinum 6 Die Cutting Machine

Easy Glide Adhesive Tape Runner

Bearly Art Liquid Glue

Small Foam Squares

Paper Trimmer

Detail Tweezers

A2 Card Base

Brushed Silver Cardstock 

All other cardstock and printed papers are from my stash.


Friday, July 22, 2022

Spellbinders New Release - Glimmer Greetings - Diamonds

 They say that diamonds are a girl's best friend and this new collection will be too!  They are all part of the Glimmer Greetings Collection.  Today I am showing off two cards I made using the new Essential Diamonds etched dies and the Glimmer Essential Solid Diamond.  They are definitely my best friends.

All products used will be listed at the end of my post.


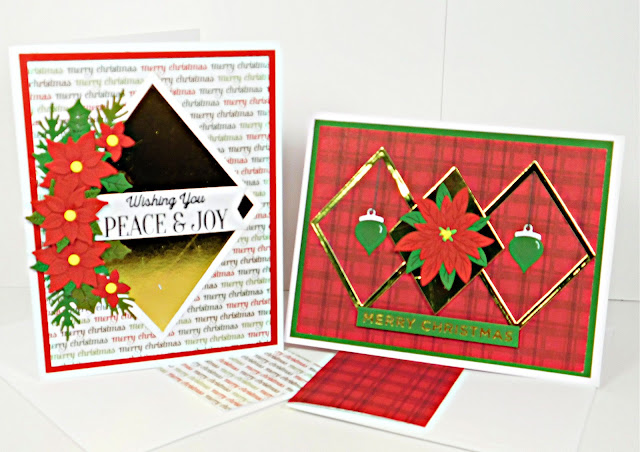
For the first card I started with an A2 card base. Then I added a mat of red cardstock, followed by a background of printed paper. I glimmered the diamond with gold foil and cut it out using the essential diamond dies.  It was then attached to the center of the card front.

I used then Christmas Blooms Die set and created the florals and greenery to arrange along the left side of the diamond popping up the center flower using a foam square..  I then stamped the sentiment onto white cardstock using the Christmas Time Sentiments Stamp set using black ink.  It was then cut and attached across the center of of the diamond.  


I had enough printed paper to decorate the envelope flap so that it coordinated with the card.

This second card is probably  one of my favorite Christmas cards ever!  I started with an A2 card base and then added a base of dark green cardstock then added a background printed paper of a red and black plaid.  I then used the essential Diamonds etched dies and cut out three diamond shapes as shown using mirrored gold cardstock and arranged them onto the card base as shown popping up the solid diamond in the center with foam squares.  Then I cut out two green ornaments from the Holiday decorations die set and added one each to the center of the open diamonds.  The center diamond was filled with a beautiful poinsettia using the Holiday Blooms Die set.  

For the sentiment I glimmered Holiday Sentiments 2 using gold foil onto the green cardstock, cut it out, and popped it up across the front of the card.  


I also added some of the plaid paper to the envelope flap to make a more coordinated set.  I hope you like these cards and will give them a try for yourself!   To check out the complete collection, just click here. 

If  you click on SOME of the links in the blog or purchase from any of the vendors on the left side of each post,  please use my link (just click on the image for the store you want to use).  It will not affect your purchase in any way, but will provide me with a very small compensation for your order.  Some are affiliate links, some are not.  This is what helps me to be able to purchase new products to share with you!  Thank you!  It is very much appreciated.  

Thanks for stopping by and have an amazing day!

Jeanne
A Stroke of Jeanne-ius
Never Stop Creating

Supplies: 

Glimmer Essential Solid Diamond

Essential Diamonds Etched Dies

Holiday Decorations Die Set

Christmas Blooms

Christmastime Sentiments Stamp Set

Holiday Sentiments 2

Mirror Gold Cardstock

Gold Foil

 Glimmer Hot Foil System

Mirror Gold Cardstock 

Platinum 6 Die Cutting Machine

Easy Glide Adhesive Tape Runner

Bearly Art Liquid Glue

Small Foam Squares

Paper Trimmer

Detail Tweezers

Versafine Claire Nocturne Ink 

A2 Card Base

detail scissors


Wednesday, July 20, 2022

Spellbinders New Realease - Glimmer Greetings Collection - Blooming Ornament

 It's Christmas in  July and today I am showing off two cards that I made using the new release from Spellbinders entitles Glimmer Greetings Collection.  One is a glimmer set called Blooming Ornament and I also used it with the Essential Diamonds Die Set.  I have listed all the supplies with links at the end of this post.


For the first card I made, I decided to create a shaker card using the ornament for the shaker window.  


I love shaker cards and this was was really fun to do.  I first glimmered the ornament and flowers onto white cardstock using gold hot flimmer foil.  After it was done, I fussy cut the inside area of the ornament as shown.  Clear acetate was then added to the back of the ornament as a window.  I also cut a  circle from some red and white striped paper tyhe same size as the ornament.  The ormament was then attached over the circle.  I glimmered the ornament topper and die cut the ribbon from red cardstock.  I used a fineine black marker to add the details to the bow.  After all of this was attached to the front of the card,  I added some red, white, and gold sequins and seed beads to the shaker area and using foam squares, I applied some red cardstock to the back of the striped piece that was slightly larger as to create a mat.  This was then all attached to a white A2 base card. I left a sentiment off of this card because I wanted the ornament to be the focal point.  


For the second card, I based it on this beautiful red and gold printed paper.  


This ornament was also glimmered in gold using gold foil.  I did the hanger in the same manner.  This time, I decided to place the flowers on the left side of the ornament.  They were foiled onto white cardstock and the cut with the coordinating dies.  The bow was glimmered with red foil and die cut.  

I used an A2 white base card and added a mirrored gold cardstock mat.  To this I added a slightly smaller piece of the pretty printed paper.  Using the Essential Diamonds Dies, I cut a diamond from the mirrored gold to frame the ornament.  This was then attached to the card using liquid Glue.  Once dry, I added the bow, hanger, and ornament.  Finally I glimmered the sentiment onto white cardstock, cut it out, and glued it to the front of the card.

I love how versatile this ornament set can be.  I hope you too, will give it a try.  Just click on the link in the supply list and you too can make these beautiful cards!

If  you click on SOME of the links in the blog or purchase from any of the vendors on the left side of each post,  please use my link (just click on the image for the store you want to use).  It will not affect your purchase in any way, but will provide me with a very small compensation for your order.  Some are affiliate links, some are not.  This is what helps me to be able to purchase new products to share with you!  Thank you!  It is very much appreciated.  

Thanks for stopping by and have an amazing day!

Jeanne
A Stroke of Jeanne-ius
Never Stop Creating

Supplies:


Monday, July 18, 2022

Spellbinders New Release -Stitchmas Christmas Collection

 Today I am Featuring two cards that I have made using products from the Spellbinders new release, Stitchmas Christmas Collection.  I have listed all the products used at the end of this post.  


For the first card, I have chosen and A2 white base card to  which I have attached a piece of green glitter cardstock from my stash which is the same size as the card front.  I then  decided to use the new Stitched Petal Diamond Background die without adding stitching.  Instead I just cut it from white cardstock and placed a piece of pink cardstock behind it to show off the design.  To continue with the pink, I added three pink poinsettias which were glimmered with blush colored foil.  The centers were embellished with fashion gold embellishments.  I then added some greenery and holly using green pearl and green glitter paper and the Christmas Blooms die set.  They were arranged in  the upper left corner and the flowers were added and popped up using foam squares.  

The sentiment was also glimmered using blush foil and the Holiday Sentiments 2 glimmer plates.  It was done on white cardstock and matted on the green glitter cardstock.  It too was popped up using foam squares along the bottom center of the card.  


For this card, I went with a red, green and gold color scheme.  I also started with an A2 card base to which I added a mat of both dark red and then some printed green paper from my stash.  I then  cut out the Stitched Joy from white cardstock.  I stitched the large flowers in dark red embroidery thread, and the centers in yellow threat.  The leaves were then cut from  green cardstock and embroidered with a light green thread.  They were then attached to the main pice using liquid glue.  I did the same for the small dark red and yellow flowers.  I found some enamel dots in my stash to use as flower centers.  

The letters were then cut from gold glitter paper and popped up on the main cut out using foam squares.  Then, the entire piece was attached to the base card.  I also had enough of the printed paper to decorate the flap of the envelope so that they would coordinate.  

I hope you like these cards!  If you love to stitch on your cards, you will love this collection.  Even if you don't like to stitch, I have showed a way to use a die from this collection without any stitching.  I hope you will check them out and give them a try.

If  you click on SOME of the links in the blog or purchase from any of the vendors on the left side of each post,  please use my link (just click on the image for the store you want to use).  It will not affect your purchase in any way, but will provide me with a very small compensation for your order.  Some are affiliate links, some are not.  This is what helps me to be able to purchase new products to share with you!  Thank you!  It is very much appreciated.  

Thanks for stopping by and have an amazing day!

Jeanne
A Stroke of Jeanne-ius
Never Stop Creating

Supplies:


Stitched Petal Diamond Background


Saturday, July 16, 2022

Spellbinders New Release - Winter Garden Collection - Letterbox

 Well here we are with my second card from the new Spellbinders Release Entitled Winter Garden Collection.  This time I am featuring the new Letterbox die set.  I have listed all the supplies used at the end of this post.  Also please be sure to check back later this week as I feature more of the new releases.  


I started this card by using an A2 card base.  I then added a snowy grey background paper.  I Then cut out the mailbox and inked the wood areas with Vintage Photo distress ink.  The snowbanks were the cut from white cardstock and the post was glued in between the two snowbanks.  The Mailbox was cut from brushed silver and using a craft knife, I slit the box along the left side to allow me to add my florals and  greens to look like they are coming out of the mailbox.  I cut, arranged them and glued them in place.  The flag was then attached using red cardstock.  

I thought It needed something else so I added a festive mini bow cut from printed paper from my stash.  For the sentiment I used Silver Hot Foil and Glimmered it onto white cardstock  It was cut out and popped up on the front of the card.

I hope You are inspired by this card and the sets I have used.  I am still bandaged heavily on my right hand from surgery and will be until the 27th of this month.  So please forgive my typing.  I tried to find all the errors and correct them, but some may have passed through. 

If  you click on SOME of the links in the blog or purchase from any of the vendors on the left side of each post,  please use my link (just click on the image for the store you want to use).  It will not affect your purchase in any way, but will provide me with a very small compensation for your order.  Some are affiliate links, some are not.  This is what helps me to be able to purchase new products to share with you!  Thank you!  It is very much appreciated.  

Thanks for stopping by and have an amazing day!

Jeanne
A Stroke of Jeanne-ius
Never Stop Creating

Supplies:


Friday, July 15, 2022

Spelbinder's New Release - Winter Garden Collectio - Hellebore, Winter Rose

 Yesterday Spellbinders released several new collections which hopefully I will be sharing with you in the coming days.  Yesterday, I had surgery on my right hand (and I am right handed)  so please forgive any typos  you might come across.  I will have a complete list of supplies at the end of this post.


To make this card, I started with an A2 white card base.  I then used a mat of dark green cardstock and then added a background of printed paper.  I then cut and created three Hellebore flower blossoms, two in red and  one in white along with several leaves.  The center of the flowers were inked with my copic markers.  Then I cut two pine cones from the Christmas Blooms die set.  I arranged and glued them onto the front of the card popping up the pine cones using foam squares.

The greeting was glimmered using the Holiday Set 2 Hot Foil Plate and gold foil  I then cut it out, framed it with the dark green cardstock and popped it up using foam squares.  I also added a piece of the printed paper to the envelope flap to make it match with the card.

This would make a beautiful card to give anyone this holiday season.

If  you click on SOME of the links in the blog or purchase from any of the vendors on the left side of each post,  please use my link (just click on the image for the store you want to use).  It will not affect your purchase in any way, but will provide me with a very small compensation for your order.  Some are affiliate links, some are not.  This is what helps me to be able to purchase new products to share with you!  Thank you!  It is very much appreciated.  

Thanks for stopping by and have an amazing day!

Jeanne
A Stroke of Jeanne-ius
Never Stop Creating

Supplies:


Platinum 6 Die Cutting Machine

Easy Glide Adhesive Tape Runner

Bearly Art Liquid Glue

Small Foam Squares

Paper Trimmer

Detail Tweezers

Copic Markers YG01, R59

Colored Cardstock from Stash

Thursday, July 7, 2022

Happy Birthday Interactive Shutter Card

 I started this card using Spellbinders products, and ended up using things from many different companies to decorate and enhance this card.  I love mixing dies to create one-of-a-kind cards.  The complete supply list will be at the end of this post.  


I started out creating the shutter card in light blue by using Spellbinders Daisy Delight Garden Shutter die set because it makes an A2 size card which I usually make.  I used the included dies to decorate the shutters and the included word dies to decorate the inside of the shutters with white cardstock.   

I wanted some decoration around the outside of the front, so I added the Elegant Twist Rectangles in white.  I then used some word dies, balloon stamps and dies, a cake die, some present dies  and flower dies to decorate the front of the card along with the word "celebrate.  

The pull tab was created using an old Spellbinders Tab Set One and then it was stamped in black ink using a lawn fawn set.  

For the base of the card I used some printed blue cardstock from my stash and it was attached to an A2 card base.  

I really like how this card turned out and the fact that it is interactive is even more of a plus.  I hope you too will give it a try.  

If  you click on SOME of the links in the blog or purchase from any of the vendors on the left side of each post,  please use my link (just click on the image for the store you want to use).  It will not affect your purchase in any way, but will provide me with a very small compensation for your order.  Some are affiliate links, some are not.  This is what helps me to be able to purchase new products to share with you!  Thank you!  It is very much appreciated.  

Thanks for stopping by and have an amazing day!

Jeanne
A Stroke of Jeanne-ius
Never Stop Creating


Supplies:

Spellbinders Daisy Delight Garden Shutters Die set

Spellbinders Elegant Twist Rectangles

SB DOM-SEPT21 Layered Mix & Match Sentiments (flowers)

Spellbinders Tab Set One  Or any other tag or punch you might have

Pretty Pink Posh Cake Die 

Pretty Pink Posh Build a Gift die set

Sunny Studios Birthday Balloon Stamp 

Sunny Studios Birthday Balloon Die

Scrapbook.com Celebrate word die from stash

Lawn Fawn Push Here Stamps

Platinum 6 Die Cutting Machine

Easy Glide Adhesive Tape Runner

Bearly Art Liquid Glue

Paper Trimmer

Detail Tweezers

Versafine Claire Nocturne Ink 

scissors

cardstock, and ink from my stash


Wednesday, July 6, 2022

Spellbinders APGDOM-Jul22 - Tiara Trifold

 Hi!  Today I am showing off two new cards I created using Spellbinders APGDOM - July 22 called the Tiara Trifold.  This is another beautiful set that I am sure you will want to add to your collection.  (a complete list of supplies used will be listed at the end of this post.  


For the first card I decided to create a tri-fold card and make it a birthday card.  I cut the base card from cream colored cardstock (12 x 12 is needed for this card) and had this pretty mauve colored print paper to also use as a background  I added flowers and the sentiment which I foiled using gold foil and popped up with foam squares.  The center panel features a place to write your personal message along with a decorative flower.  The final panel is the same as the front, only I added a flower and some sprigs.  I am really happy with the outcome.  I also added some of the printed paper to the envelope flap so that it matched the card.


The second card was actually the first one I created with this set.  It is done in pink and white.  I used a dark pink background which was attached to an A2 card base.  I then cut a piece from light pink patterned paper and added the next layer with white.  I then die cut the flowers and the sentiment also from the set and added them to the front of the card.  


I love this die set and hope you do too.  To check out all of Spellbinders Club Kits, just click here.  There is always something for everyone! 

If  you click on SOME of the links in the blog or purchase from any of the vendors on the left side of each post,  please use my link (just click on the image for the store you want to use).  It will not affect your purchase in any way, but will provide me with a very small compensation for your order.  Some are affiliate links, some are not.  This is what helps me to be able to purchase new products to share with you!  Thank you!  It is very much appreciated.  

Thanks for stopping by and have an amazing day!

Jeanne
A Stroke of Jeanne-ius
Never Stop Creating


SUPPLIES:

A2 card base

APGDOM-JUL22 - Tiara Trifold

Elegant Occasion Sentiments

Rose Gold Foil

 Glimmer Hot Foil System

Platinum 6 Die Cutting Machine
Easy Glide Adhesive Tape Runner

Bearly Art Liquid Glue

Small Foam Squares

Paper Trimmer

Detail Tweezers

Scissors

12x12 cardstock (for tri-fold card only)       , 8.5 x 11.o cardstock, printed paper  all from my stash 


Tuesday, July 5, 2022

Spellbinder's CSDom for July 2022 - Have a Chill Summer

 I hope you all had a wonderful and safe holiday yesterday!  I know I did.  Today I am showing off two new cards featuring Spellbinders Clear Stamp and Die of the Month for July 22 called Have a Chill Summer.  I loved this set and had lots of fun creating with it.  (All supplies used are listed at the end of this post.)


The card on the right with an A2 card base.  I had this fun ice cream treats paper in my stash and new it would make a perfect background for this particular set.  So I matted the front of the card with some dark pink cardstock and then added another mat of the printed paper.  

Next, I die cut the popsicles from the same dark pink and lavender cardstock.  I then used my copic markers to color the stripe down the middle just like on the background paper.  The edges of each popsicle was inked using a dauber and Festive berry and Dusty Concord  distress inks for each one.  The sticks were stamped, and then die cut.  I inked the edges with some Vintage Photo distressed ink and glued them to the popsicles.  

I glued the pink one directly onto the card base and popped the lavender one up using foam squares.  I did the same for the sentiment which was stamped with black ink and cut out of white cardstock and mounted on some of the same dark pink.  Here is a photo of the finished card.  I also added some of the printed cardstock to the flap of the envelope to make them really look like they go together.  


The next card is a little more interesting.  I recently have been playing with interactive cards and searching and learning how to make them on You Tube.  I came across a video by May May Made It with instructions on how to make this particular type of card.  I know these have been around forever, but some of you, like me, may have never tried one.  I really love how fun and easy they were to create.  

I started with a top fold A2 card base to which I added a mat of both light and dark pink as shown.  I then added a strip of printed paper down the right side of the front using some more printed paper that I had in my stash.  I then die cut out two popsicles from the same dark pink cardstock and colored the center of each one using my R14 copic marker and a white jelly roll pen to make them look like the ones on the paper.  

The sticks were stamped, cut, and inked with Vintage Photo Distress Ink.  The left popsicle was glued to the printed paper white the right one was attached using foam squares.  I did the same for the sentiment as I did for the first card.  

I felt that it needed something else so I added three strawberries also from the set.  They were cut from the same dark pink cardstock.  I cut the leaves from green cardstock and they were stamped with Mowed Lawn Distress Ink.  They were then glued to the front of the card.  

The inside was the most fun.  Following the instructions from the video mentioned above, I created the base section including the pop up portion using the dark pink.  The top and bottom portions were both matted with a piece of the printed cardstock.  I then used a corner rounder to round off the corners of each square and then decorated them with two more shades of pink and white.  The colors were layered as shown and the glued in place.  Using the dark pink cardstock and the Be Bold Upper Case Alphabet dies, I cut out the word "COOL" and attached one letter to each square.  Then I added some strawberries which were done the same as they were for the front.  Finally this whole piece was then attached to the inside of the card.   I really love how this one turned out.  I am so into interactive cards lately and I am sure I will have many more to come in the future.  Here are photos of the second card:


I hope you like them too and will want to give them a try for yourself.  For more information on Spellbinder's Club Kits, please click here.  

If  you click on SOME of the links in the blog or purchase from any of the vendors on the left side of each post,  please use my link (just click on the image for the store you want to use).  It will not affect your purchase in any way, but will provide me with a very small compensation for your order.  Some are affiliate links, some are not.  This is what helps me to be able to purchase new products to share with you!  Thank you!  It is very much appreciated.  

Thanks for stopping by and have an amazing day!

Jeanne
A Stroke of Jeanne-ius
Never Stop Creating

SUPPLIES:

 May May Made It instructional video on You Tube.
Distress Ink Vintage Photo
                     Dusty Concord
                     Festive Berries
                     Mowed Lawn


Monday, July 4, 2022

Spellbinder's Die of the Month July 2022 Day At the Beach

 Happy Fourth of July!  Today I am showing off the Spellbinder's Day At The Beach Small Die of the Month for July 2022.  This adorable die set creates the most perfect beach scene cards!  All the products used are listed below.


I started off with a piece of watercolor paper and using my watercolor set, and a 1/2 inch flat brush I water colored the background to look like the beach, ocean and sky.  When dry, I applied it to the front of an A2 base card.  Next, I cut all the pieces needed using my platinum 6 machine and paper scraps.  I adhered all the pieces as shown and then stamped the sentiment using the clear stamp and die of the month.  I popped it up using foam squares.  With a black fine line marker, I added some flying birds to finish off the scene.  

I love how this tuned out.  I am really not a watercolorist, so to have it turn out so nicely, was a surprise for me!  

For information on all of Spellbinder's amazing club kits simply click here.

If  you click on SOME of the links in the blog or purchase from any of the vendors on the left side of each post,  please use my link (just click on the image for the store you want to use).  It will not affect your purchase in any way, but will provide me with a very small compensation for your order.  Some are affiliate links, some are not.  This is what helps me to be able to purchase new products to share with you!  Thank you!  It is very much appreciated.  

Thanks for stopping by and have an amazing day!

Jeanne
A Stroke of Jeanne-ius
Never Stop Creating


Supplies:

A2 card base

DOM-JUL22  Day at the BeachCSDOM-Jul22 -  Have a Chill Summer

Fineline Black Marker

Kuretake Gansai Tambo 48 pc Water Color Set

1/2" Royal Aqualon Flat Brush

Watercolor Paper

Platinum 6 Die Cutting Machine

Easy Glide Adhesive Tape Runner

Bearly Art Liquid Glue

Small Foam Squares

Paper Trimmer

Detail Tweezers

Versafine Claire Nocturne Ink