Sunday, June 26, 2016

CYCI #126 Die Challenge


This is the card I decided to create for the CYCI #126 Challenge over at www.canyoucaseit.com.  If you follow my blog, you will know that I am now an official Design Team Member!!!  Yeah!

This week's challenge was to use your favorite die.  Well, I have so many, it was really hard to choose.  I had had this Stampendous Jumbo Hydrangea stamp set for quite a long time now and never used it.  While at the craft store the other day, I came across the matching die set, Stampendous Garden Die Cut Set, so, I thought this was the perfect time to use them!

I started by stamping all the images onto white cardstock using my Versafine Tuxedo Black ink.  Then I colored the blossoms using my Spectrum Noir markers and enhanced the coloring using my Prismacolor Pencils (colors listed below).  I just love the soft blues and violets that I was able to achieve.


Starting with a 5x7 white base card, I attached a light blue die cut using my Spellbinders Enchanted Labels 28 die.  I created a white label using the coordinating Spellbinders Labels 28 die and adhered it to the blue die.  I placed the leaves where I thought they looked the best and glued them down.  With craft foam, I cut a piece to fit the back of the blossom cluster.  This was then glued to the card giving the blossom a raised effect.

With my Nellies Tags 4 dies and the same blue paper, I cut a small tag and added a white eyelet to the whole.  It was then stamped with a "Thinking of You" sentiment stamp using VersaMark watermark stamp pad.  Using  Whispers, Seafoam White embossing powder, I embossed the sentiment and attached the tag to the card along with a small lavender satin ribbon bow.  You could really use almost any sentiment stamp for this card.


Finally for the inside, I cut a piece of the blue paper slightly smaller than the inside of the card and glued it into place.  With an even smaller piece of white card stock, I glued that onto the blue mat.  Then I adhered some of the small blossoms to the corners of the inside leaving plenty of room for a personalized message.  


I LOVE to color and am really happy with how this stamped image turned out.  Hydrangeas are definitely one of my favorite flowers!   I hope you enjoyed this card and will maybe give it a try for yourself.  Please be sure to stop by canyoucaseit.com and check out all the design team members wonderful examples.  And don't forget to play along yourself!  It is just too much fun.   Please tell your friends too!

Until next time!
Jeanne

Color Choices:  (SN = Spectrum Noir and PC = Prismacolor)

Lavender Blossoms:  SN: HB1, HB2, HB3, PC: Violet and Parma Violet (with tints of Hot Pink)
Blue Blossoms:  SN:  TB2, TB1, TB3,  PC:  Indigo Blue and Blue Lake  (with tints of Hot Pink)
Flower centers:  SN:  CG1
Leaves:  SN:  LG2, CG1, CG2,  PC:  Prussian Green, Chartreuse and tints of Burnt Ochre


Wednesday, June 22, 2016

Adorable Baby Girl Card


Oh do I love pink!  As a design team member for Digibox Designs, as soon as I saw this image,  I just couldn't wait to color it.  Called digi buggy girl, I downloaded her and did a print and cut using my Silhouette Cameo.  I then colored her using my Spectrum Noir markers and Prismacolor pencils  (color list below).

The only thing I don't like about the Spectrum Noir markers is that they don't really have true pinks, therefore, it was very difficult to find papers that matched.  I did the best I could with what I had.  I used a 5x7 base card and matted it with some simple pink and white striped scrapbook paper.  Then using a plain pink card stock, I cut out the oval with my Heartfelt Creations Eyelet Oval die and centered it on the striped paper.  I added the digital image on the left side of the paper.  Then, using my recollections 1 1/2 inch punch, I punched out 4 squares from white card stock.  Matching the greens, yellow, purples, and pinks, from the image as best as I could, I cut out the letters using my Spellbinders Font One Upper Case and Lower Case die sets and glued them to the squares.  I then adhered the squares down the right side of the card.  Finally I found a small glittered white heart in my stash and added that to the center of her bib.

I can't tell you how much I love these digital stamps.  Each one is cuter than the other and there are lots of fun ones to choose from!  Stop on over and check them out at www.digiboxdesigns.com

Colors used:
Spectrum Noir:

Star:  LY2, CT1, GB1
Bib, Rattle Stripe, "B":  Bt2, Bt3, Bt4
Pacifier base, Buggy handle, Hearts:  HB1, HB2, HB3
Bow, Bottle rim, Buggy Trim:  PP1, PP2, CR4
Wheel hubs, Center of Block, Pacifier handle:  PP1, PP2
Carriage Body, Block Frame:  PP2, PP4
Spokes and Bottle:  IG1
Skin:  FS2, FS3, TN3
Nipple:  FS3, TN3
Rattle:  TB@, TB1, TB3


Prismacolor Pencils:
Spokes, Bottle, Clothes, Buggy lace, Bottom of wheels:  20% warm grey
Buggy Handle, Pacifier base, Hearts:  Violet
Bib, Rattle Stripe, "B":  Aquamarine, Lt. Green, Pale Sage
Star:  Goldenrod
Cheeks:  Pink
Light Pink areas:  Pink, Blush Pink
Dots on shirt:  Sakura Gely Roll Pen, Pink XPGB#21

Hope you enjoy this card!
Thanks for stopping by!

Jeanne

Tuesday, June 21, 2016

Exciting News!!!


Well, as many of you who follow my blog know, I have recently been participating in the challenges over at www.canyoucaseit.com.   Well, as of today, I am officially a Design Team Member!!  Yeah!!  This is so exciting for me to be one of the lucky ones chosen for this honor.

I would encourage all of you to please stop by and participate in the weekly challenges.  They are so much fun and really help to guide you in creating some very unique and original cards.  Sometimes we get stuck for ideas, and the challenges will lead you in a direction that you may not otherwise have considered.  Come on!  Show off your creations!  We all love to see them and just maybe you will be selected as one of the DT member's choice of the week!

Until next time,
Jeanne


Sunday, June 19, 2016

CYCI #125 Color Challenge, Red, Grey, Black, and White


This week's challenge over at CanYouCaseIt.com really had me scratching my head.  I loved the colors chosen, but just didn't quite know how to apply them to a card.  Recently I purchased a new set of dies and embossing folder that were music themed, so decided I would use them in this challenge.  The rest, as they say, is history!

I started with a white A2 base card.  Then using a rich red colored card stock I added a mat, but first attached three black brads thru the paper.  The paper was then mounted on craft foam and adhered to the card.

I took a 2 1/8 x 5 1/4 inch piece of white card stock and adhered it to the left side leaving a small border of the red showing.  Using my new embossing folder, I embossed a piece of grey card stock and cut it to 1 2/3 x 5 1/4" and centered it on the white piece.  The musical note was cut from black card stock and adhered to the  grey paper.

With a stamp from my stash, I stamped "Just a Note" with black ink onto white card stock that was cut using a stitched rectangle die.  I then cut another rectangle using the next larger stitched rectangle die using black card stock and glued the black onto the card.  I added some more craft foam to the back of the white label before adhering it to the black.

Here is a picture of the inside:


This was a very quick and easy, clean and simple card that met the requirements for the challenge.  Plus, I got to use my new toys!

Stop on over to www.canyoucaseit.com and try the challenge for yourself!  It is so much fun!

Thanks for stopping by,

Jeanne

Materials Used:

Red, Black, White, and Grey card stock
"Just a Note" stamp
Spellbinders Love Notes Dies
Darice Sheet Music Embossing Folder
Memory Box Stitched Rectangle Layers dies
Black Round Brads
Glues and Adhesives
Craft foam

Please note:  I am in no way affiliated with any of the products or manufacturers of any of the products used in the making of this card.

Friday, June 17, 2016

Baby Boy Mini Journal, Scrapbook, Photo Album


The past couple days I have decided to try my hand at creating a mini journal/scrapbook/photo album.  I have been inspired by following a wonderful paper artist by the name of Debbie Bankston.  She makes the most wonderful journals, check her out on facebook if you get a chance.  

Anyway, I purchase a lot  of my supplies from yard sales, flea markets, craig's list etc. and I had tons of stickers, papers, and die cuts of baby themed items and decided to make a mini baby book.  The front and back cover paper was attached to the chipboard using DecoArt DecouPage.  Front cover has a sleeve to insert a photo of the baby, a matching paper bow and some cute plastic charms.  Here are a couple pictures of some of the inside pages.  


To see a page by page flip thru and explanation on how it was made, check out my You Tube video below:


If you watched the tour of my craft room from my last video post, well let me tell you it looks nothing like that now!  It looks like a tornado went thru LOL!  I need to go clean up a little.  I want to try a baby girl book next.  I think these would make cute shower gifts.

Hope you like it and it inspires you to give it a try!

Thanks for stopping by,

Jeanne

Tuesday, June 14, 2016

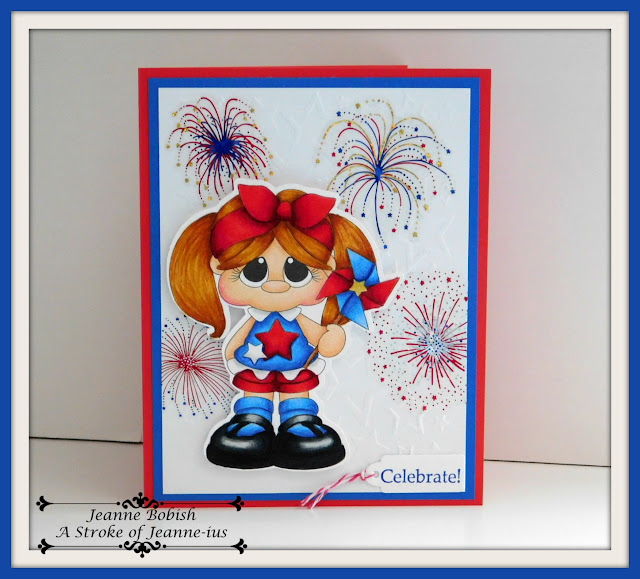
Celebrate Patriotic Girl Card


This cute, colorful card features another wonderful digital stamp from DigiBox Designs.  The image is called Digi Patriotic Girl and is on sale now for only .60 cents!!!

I first print and cut the stamp using my Silhoutte Cameo.  Then colored it using my Spectrum Noir markers and Prismacolor pencils (colors listed below).  I can't tell you how much I LOVE using the two together.  The color and detail you can achieve is so fabulous!   Using a 5 x 61/2" base card, I then matted that with blue card stock followed by white card stock which was embossed with my Darice Assorted Stars embossing folder.  I found some wonderful firecracker stickers in my stash and stuck those on the white panel.  The digital image was mounted on craft foam and then glued to the front of the card.  It adds some dimension and gives the appearance of the fireworks in the background.  With one of the smaller tags from the Tim Holtz Tag Collection die set, I cut out a tag of white, stamped with my word stamp with VersaFine Majestic Blue Ink.  I attached some red and white baker's twine and glued onto the front bottom of the card.


I added a white panel on the inside of the card for writing and more of the firework stickers.  I love how this card came together.  This card could be used for any type of celebration, not just the fourth of July.


This is a close up of the digital stamp.  You can see how adorable these stamps are and how beautiful the colors are using both the alcohol markers and colored pencils.  Please, if you have a moment, check out DigiBox Designs.  All there images are so cute and so much fun to color!
Hope you like this card!

Thanks for stopping by!
Jeanne


Colors Used for Digital Stamp:

Spectrun Noir Alcohol Markers:
Skin:  FS2, FS4
Blues:  TB1, TB3, TB4
White:  Blender, IG1
Reds:  CR7, DR3, DR4
Hair:  TN2, TN4, TN6
Shoes:  True Black, IG1, IG4, IG7, IG10

Prismacolor Colored Pancils:

Skin:  Peach, Lt. Peach
Blues:  Indianthrone Blue, Copenhagen Blue, Lt. Cerulean Blue
Reds:  Black Raspberry, Crimson Lake, Scarlet Lake
Wand Handle:  Burnt Ochre, Chocolate
Hair:  Goldenrod, Terra Cotta, Dark Brown
Star:  Yellow Ochre
Shoes:  Black
Cheeks:  Hot Pink

Monday, June 13, 2016

Are you feeling a little crabby?

Well here is a card for you!


I used the new cut files from Sanqunetti Designs to create this cute card.  The base of the card is navy blue cardstock cut to form a 5.5 x 5.5 inch card.  I then added a mat of white card stock which measures 5.25 x 5.25 inches.  Using my new Spellbinders Belly Band  Two dies (using the two largest dies) I cut one of navy blue and one of grey card stock trimming so they fit the card.  The crab and the lettering is from the "little miss crabby" cut file.  I added a question mark, enlarged the image and letters and cut them using my Silhouette Cameo.  I then added red flat back pearls to embellish.  Using a fine point black sharpie I lined his arms and legs.  Then I used a white Signo pen to add highlights to him and his eyes.  


The inside of the card reads "Hope this card Brightens your Day!"   A fun card that was super fun to make!

 Stop on over to www.sanqunettidesigns.com and get your cut files now!  There are lots to choose from.


Thanks for stopping by!

Jeanne

Sunday, June 12, 2016

CYCI#124 - Watercolor Challenge

This weeks challenge over at Can You Case It was a real challenge for me.  I have never used watercolors before, so spent most of the week playing with them.  I colored some stamped images, but wasn't real happy with them (may use on a future card).  I kind of took the easy way out and just created a simple watercolor background.  Here is my entry for the cyci #124 challenge:


I like how this card turned out!  I used watercolor paper and some inexpensive watercolors to create the background.  I wet the entire piece of paper and then added color starting with yellow, then orange, and finally red.   I think these colors are cheerful and made a very pretty background.  I adhered the watercolor paper to a 5x7 white base card.  Then I cut out my Spellbinders Grate Effects die from white card stock and adhered it to the watercolor paper.  I also used my Spellbinders Belly Band Two die for the label and stamped the sentiment with orange ink.  The leaves were cut and embossed using the Spellbinders Foliage die.  I had these adorable fabric daisies with yellow pom pom centers in my stash.  I purchased them in a lot of embellishments from a yard sale and thought they were perfect for this cheerful card.  I then added an orange butterfly from my stash as the final touch.  I hope you like this card.  Please stop by www.canyoucaseit.com and participate in the challenge too!  It is so much fun and you just might win!

Thanks for stopping by!

Jeanne


Friday, June 10, 2016

Video Tour of my Craft Room


Today I thought I would share something a little different with you all.  I thought maybe you would like to have a video tour of my craft room.  I have a lot of storage ideas that you might find helpful and also a self made work space (photo above) that I just love.  It was so beautiful when I first made it and before I started paper crafting (see photo below).   It was mostly empty and so neat and tidy.  Boy you sure do need a lot of stuff to make greeting cards LOL!  I sure did fill it up fast!


I hope you will take a few minutes to watch the video (below).  And, as always, I  would love to hear your comments or suggestions.


 Thanks for stopping by!~

Jeanne

Sunday, June 5, 2016

CYCI #123 Challenge - Red, White, & Blue

This week's challenge over at Can You Case it? is Red, White, and Blue.
 Now normally when I think of those colors I think of something patriotic.  But this time I wanted to do something different an non-patriotic looking.   So I put on my creative thinking cap and came up with the following card:


 I started with a white 5x7 base card.  I then cut a piece of blue card stock to measure 4.75 x 6.75.  Using the edge embossing folder from the Anna Griffin "Bit of Paisley" Embossing set , I embossed down the right side of the blue.  It was then centered and glued onto the card. Next I cut a piece of white card stock 3 7/8 x 6.5".  Using my Martha Stewart Vintage Floral edge punch, I punched down the right side of the paper.  It was then embossed using the large Anna Griffin "Bit of Paisley" embossing folder and glued onto the blue paper 1/8th inch in from the left side and top and bottom of the blue mat.  Bird was cut using my Paper Artist "10 Tiny Things Plus Shadows" dies, cutting the shadow from red and the bird outline from blue card stock.  The cage is a Spellbinder's Birdcage 2 die, cut from red paper.  The "hello" was taken from my Sizzix  Scalloped with Banners and Greetings Drop Ins" die set.  I trimmed the Hello to leave just the underline and the word itself.  It was the only hello die I had and I am so glad I was able to make it work.


Flowers were created using flower dies from two different die sets.  The blue and red flowers were cut using the flower from the Spellbinder's Springtime die set.  The white inner flower petals were cut using the small flower that comes with the Our Daily Bread Easter Basket die set.  The flowers were shaped and glued together.  I didn't have any blue pearls so used white pearls and colored them with my Spectrum Noir TB9 Alcohol Marker.  For the red flowers and white lace edge, I used medium sized red flat back pearls.  The blue vines were created using the Stampin Up build a bird punch. 


Finally, I added some tiny white flat back pearls to the embossed arches along the right edge of the blue paper.

I really like how this card turned out.  I think I achieved my goal of creating a pretty, colorful card that does not look patriotic.  What do you think?

Why don't you stop by www.canyoucaseit.com and join in the challenge!  It is a lot of fun and we would love to see what wonderful ideas you come up with!

Keep playing with those papers!!!!

Jeanne


Thursday, June 2, 2016

Graduation Easel Card


Looking for a cute, colorful graduation card that would be perfect for any graduate in your life?  Then here is a card for you!   Card is made from another adorable digital stamp from DigiBox Designs.  The stamp is called Digi Grad Bear, and is really cute.  I downloaded the file and did a print and cut on my Silhouette Cameo.  I then colored the image with both my Spectrum Noir alcohol markers and Prismacolor pencils.   I have listed the colors I used to color the image below.

I started with an A2 size white base card.  I folded the front in half to create the easel.  I then used my Spellbinder's Valiant Honor die set to cut out the mat from black cardstock.  (It kind of reminds me of a blackboard).  I also cut a piece of white card stock the same size as the black die cut mat so that when the card stands on the easel, you see the white behind the cutout border of the black.  Glue the white mat behind the black die cut.  Then, glue the bottom half only of the mats to the front of the card.

Also using black card stock, I cut two of the long narrow dies from the same set as above.  The die cut piece was not large enough to fit the lettering I wanted to use with it.  So, what I did is cut two of them, cut off one end of each label and matched the two pieces to make one larger size one.  I cut out a piece of red card stock to use as a mat behind the black label. This also helps the front of the card to stand.  Finally using white card stock, I cut out the Congratulations from my Spellbinder's Sentiments One die set.  I glued these three pieces together and attached to the inside bottom of the base card.

I had some velum streamer stickers and red sequins (which don't show too well in all the photos) which I also added to the front.

Please stop by DigiBox Designs and see all the wonderful digital stamps.  You will be so glad you did!

I am a design team member for Digi Box Designs, but have no affiliation with any of the other products used to create this card.


Colors Used:

Spectrum Noir Alcohol Markers:

Bear:  TN2, TN3, TN5, TN4
Eyes:  TB2, TB4 and Prismacolor colored pencil Indianthrone Blue
Book Pages:  LY2, FS1 and Prismacolor Beige Sienna for the page lines
Red Book Binding:  DR2, DR6
Green Book Binding:  LG3, JG1
Nose and Cap:  IG1, IG4, IG7, IG9, True Black
Diploma:  Blender Pen, IG1, IG2
Tassle:  CT4 and Prismacolor colored pencil Burnt Ochre