Thursday, May 31, 2018

Dahlia Cut Away Card

I LOVE dahlias.  They are such beautiful flowers and come in so many colorful varieties.  Fun Stampers Journey has a beautiful Dahlia Burst Stamp set that worked perfectly for the card I created for today's post.   I am not sure of the exact name for this type of card, so I am calling it a cut away card since you cut away a portion of the background.


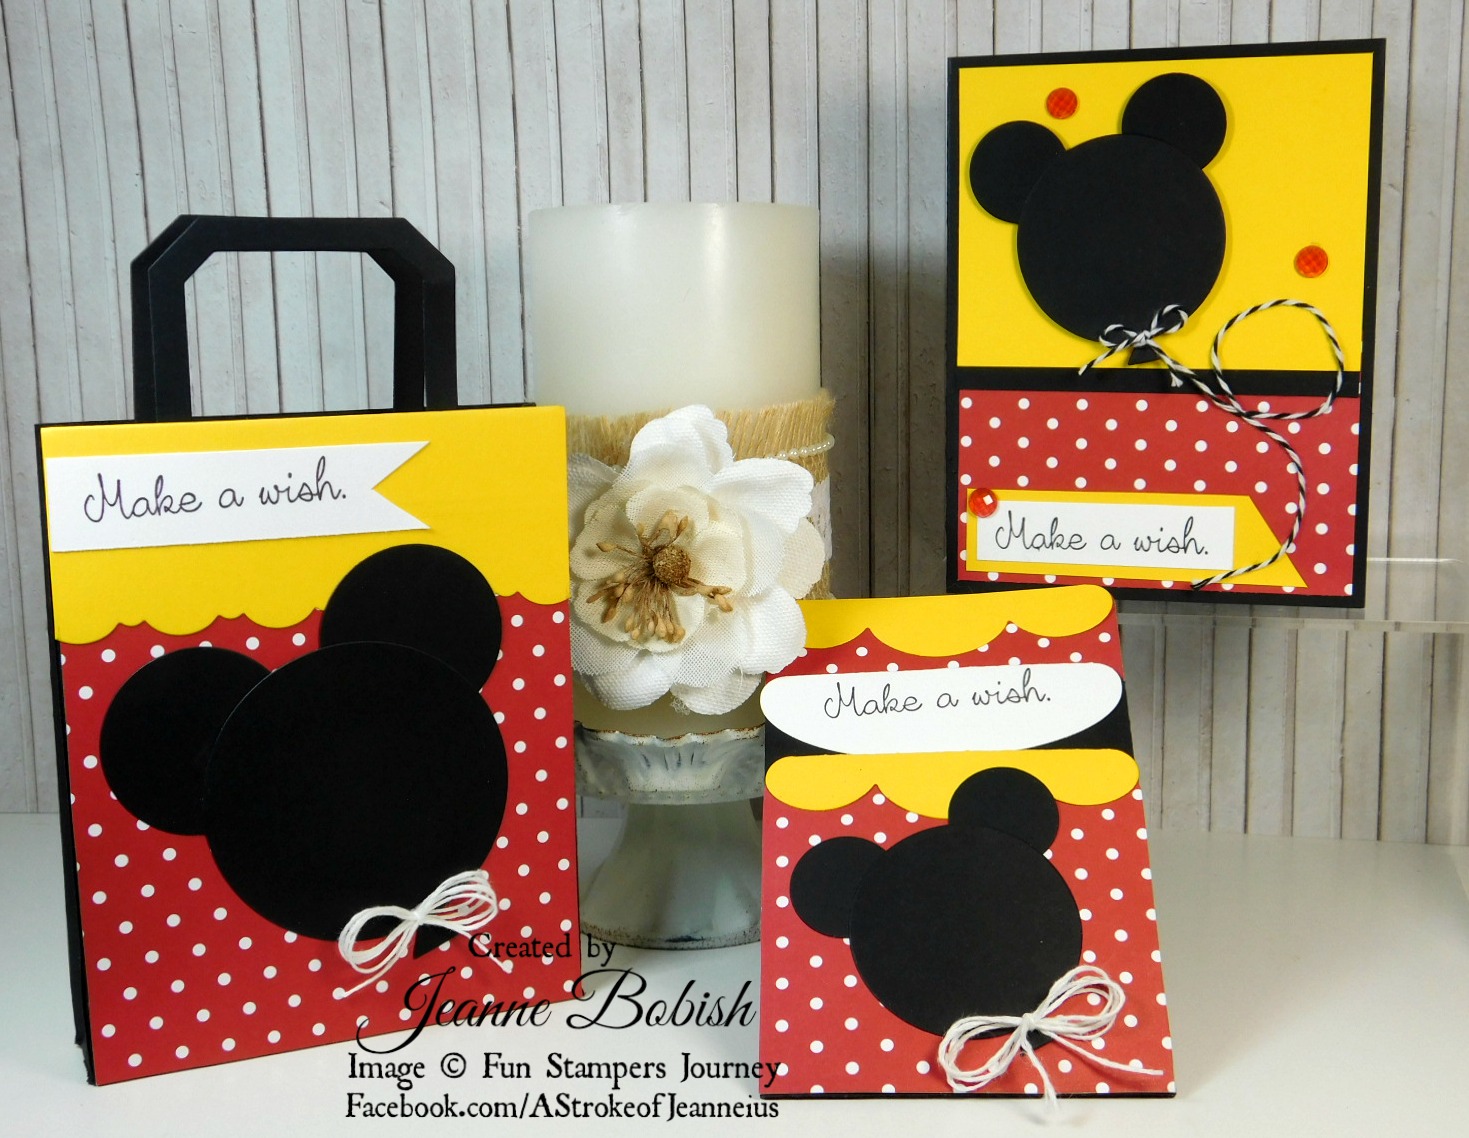
I love this stamp set as it always makes the most beautiful cards.  For this card, I started with a Whip Cream card base.  I then cut a piece  of  Pool Play card stock 5.25 x 4 inches and attached it centered on the front of the card base.  Next I took another piece of Whip Cream card stock the same size as the Pool Play piece and drew a soft pencil line across the piece.  This line would be where I placed the center of the stamped images.  I started with the largest dahlia stamp and stamped it in the middle of the piece straddling the pencil line.  I masked that image off and stamped the smaller dahlia image on either side of the larger one, straddling the center line and making sure that the image goes all the way to the side of the paper.  I then created masks for the small dahlias and stamped two leaves onto the front as shown.


The stamped images were colored using Color Burst Colored Pencils.  The top half of the flowers were fussy cut above the pencil line as shown above.  For some added bling, I placed some of our Pool Play Sparkle tape along the bottom of the stamped piece leaving a very small amount of Whip Cream showing below it.  That piece was then placed onto the Pool Play mat which added some color behind the top of the dahlias.  I also  placed it so a small amount of the Pool Play showed underneath this piece.

The sentiment was then stamped onto Whip Cream card stock and fussy cut out.  I used the Must Have Sentiment Stamp set for that.  It was popped up onto the sparkle tape.  As a final touch, I added three blue  Rainbow Drops.  And here is the finished card:


This card would be perfect for so many occasions, like a non-traditional graduation card, a promotion card, or just because someone made you proud.  I hope you would be proud to give it and happy to receive it!

Today is day number 16 of my Make it to Manager Bundles. I need to reach  a certain sales amount to achieve this goal and you can help me get there.   So for 30 days I will be offering a bundle for each project I create.  This bundle will be products used in each post and the total will include shipping and tax (if applicable).   All you have to do is press the Paypal Button below the bundle to purchase yours.

TODAY'S  BUNDLE
includes:

Dahlia Burst Stamp Set
Must Have Sentiments
Pool Play Sparkle Tape 

All for just $50.42 which includes shipping and tax (where applicable)


I have listed the complete supply list below that links each item to my online store for purchase.  It can also be printed out by clicking the small "supply list" below the items.  I hope you enjoyed this card.  Thanks for stopping by and have an amazing day!

Jeanne
A Stroke of Jeanne-ius

Tuesday, May 29, 2018

Bushel Full of Daisies

I don't know about you, but I totally love daisies.  They are so bright, cheerful, and fresh.  So when I was thinking of what to create for today's card, I thought about a bushel full of daisies and Fun Stampers Journey had just the products I needed to bring it to reality!


I started off by creating a card base from Hazelnut Blend card stock.  I must say, this is my favorite choice for brown.  I then cut a mat from Turbo Teal and stamped it with the Canvas Prints background stamp using Turbo Teal ink.  It made for a very soft and subtle background.

I love to use tags on my cards, so I chose the largest tag from the Tag Set Steel Rule Die using Oatmeal Cookie card stock.  In my opinion, this is a must have die for your collection.  The bushel basket was stamped on Whip Cream card stock with Hazelnut Blend ink using the Bushel & a Peck stamp set.  I then cut it out using the matching die.  To enhance the basket further, I shaded it using Color Burst Colored Pencils.

I stamped the daisies three times onto Whip Cream card stock using Black Licorice ink.  I then colored the centers and shaded the petals with Color Burst Pencils.  One complete set was fussy cut out and I created a slit in the basket using the new Retractable Craft Knife and Cutting Mat and slid the stems of the flowers thru the slit. I chose certain flowers from the remaining stamped images, fussy cut them and arranged them behind the other flowers to fill up my basket.  They were adhered in place and attached to the tag.  I added some Natural Twine to the tag and also created a multi-looped bow to place on the front of the basket.

The sentiment was stamped on Whip Cream card stock using Turbo Teal Ink and cut out using my detail shears.  It was then popped up with foam squares and place on the top of the card.  Here is a closeup:


I think it ended up being a very pretty and cheerful looking card.  I hope you agree!

Today is day number 15 of my Make it to Manager Bundles. I need to reach  a certain sales amount to achieve this goal and you can help me get there.   So for 30 days I will be offering a bundle for each project I create.  This bundle will be products used in each post and the total will include shipping and tax (if applicable).   All you have to do is press the Paypal Button below the bundle to purchase yours.

TODAY'S  BUNDLE
includes:

Bushel & a Peck Stamp and Die Set
Canvas Prints Background Stamp
Lovely Day ATS
PLUS a free bloom benefit!!!

All for just $72.11 which includes shipping and tax (where applicable)


I have listed the complete supply list below that links each item to my online store for purchase.  It can also be printed out by clicking the small "supply list" below the items.  I hope you enjoyed this card.  Thanks for stopping by and have an amazing day!

Jeanne
A Stroke of Jeanne-ius

Monday, May 28, 2018

In Memory of Those Who Have Served.

Today in honor of  Memorial Day, I decided to create a card to thank all those who have served, both past and present.  Fun Stampers Journey had just the products I needed to create the perfect card.


I, of course, wanted to use a patriotic theme and went with a Huckleberry Fusion card base.  I added a mat of Candy Apply and then cut another mat of Whip Cream.  On the Whip Cream piece I randomly stamped the firework stamp from the Bravo Grad stamp set in both Candy Apple and Huckleberry Fusion inks to create a fun background that looks like exploding fireworks.

Next I cut out two stars using the smallest die in the Star-Dom die set.  One was cut from Huckleberry Fusion card stock and the other from Candy Apple.  I stamped the sentiment from All You Do ATS stamp set onto Whip Cream card stock in Black Licorice Ink.  It was then adhered to a band of Candy Apple and a slightly larger band of Huckleberry Fusion card stock.  This was then placed across the center of the card with the stars adhered one above and one below the center band.  As a final touch I added some Party Burst Dots in the star shape.


This card was extremely easy to create, but has so much emotion and meaning behind it.  I want to personally thank everyone who has served in the past or is serving now.  I am so grateful to all of you.  Your sacrifices and hardships are deeply appreciated and I think it is super important to let you all know, not just today, but everyday!  If you come across a serviceman or woman in your daily life, please be sure to thank them for their service.  You are all my heroes!


Today is day number 14 of my Make it to Manager Bundles. I need to reach  a certain sales amount to achieve this goal and you can help me get there.   So for 30 days I will be offering a bundle for each project I create.  This bundle will be products used in each post and the total will include shipping and tax (if applicable).   All you have to do is press the Paypal Button below the bundle to purchase yours.

TODAY'S  BUNDLE
includes:

Star-Dom Star Die Set
Bravo Grad Stamp Set
All You Do ATS
PLUS a free bloom benefit!!!

All for just $66.90 which includes shipping and tax (where applicable)


Sunday, May 27, 2018

In a Disney State of Mind

Recently, my friend and neighbor asked me if I would paint a Minni Mouse statue she had in her yard for her grandson.  It had gotten rather faded from the sign and needed freshed up a bit.  So I agreed.  While painting her, I thought up a great, easy card idea.  Then, that blossomed into a card carried and a double pocket.


As I was painting Minnie's dress, which was red with white polka dots, it reminded me of the fun polka dot paper in Fun Stampers Journey Sunday Adventure Prints.  Then, one thing let to another and I created the card.


I started with a Black Licorice card base and cut a piece of Lemon Drop and the polka dot paper to fit on the front.  The Lemon Drop was cut slightly larger than the polka dot.  I added a thin strip of Black Licorice to cover the seam.  Then using the Uplift Die set, I cut the smallest balloon from Black Licorice and with the smallest of the Journey Circles Dies, I cut two out of Black Licorice and glued them to the back of the balloon to resemble a Mickey Mouse balloon.  The balloon was then popped up using foam squares. The sentiment from the Dandelion Wishes stamp set was absolutely perfect for this card.  I stamped it in Black Licorice, on Whip Cream card stock and then adhered it to a piece of Lemon Drop with the right side cut at an angle.  For the finishing touches I added three red Rainbow Drops and some Black Licorice TwistTwine as the balloons tie.  

After looking at the card for a couple days it occurred to me that I could create a card carrier (or small gift bag).


I used the Fun Stampers Journey Card Carrier die set and cut it out of Black Licorice.  I trimmed 1/4" off the top of the pieces to remove the zig zag edge.  I  wanted to use a border, so the zig zags had to go LOL!.  I cut a piece of the polka dot paper to fit the front of the bag and adhered it into place.  I assembled the bag and created the scalloped edge using the Border Basics die set.  I then created the balloon the same as I did for the card, but used the larger dies to make a larger balloon.  I adhered it to the front and added a small white thread bow at the bottom of the balloon.  The sentiment was stamped on Whip Cream card stock and attached to the top left of the yellow border.

After making the bag, I thought why not a double pocket?


So I cut one using Black Licorice and the Double Pocket Die.  (You will need the platinum or a larger die cutting machine for this die)    I cut two pieces of the polka dot paper to fit the front and inside top pocket and adhered in place.  I creased the pocket along the crease lines and assembled.  Using the Lemon Drop card stock, I cut two of the scalloped pieces from the set and attached them to the top of the piece and to the bottom pocket.  I cut the large edge from Whip Cream Card stock and stamped the same sentiment as used for the card onto the flap.  Then I attached that to the top pocket.  I cut the Mickey Balloon the same as for the card and added a Whip Cream thread bow.

What a great set to make for a kid's party or someone who truly loved Disney.  I hope you like how these turned out and will give them a try!


Today is lucky day number 13 of my Make it to Manager Bundles. I need to reach  a certain sales amount to achieve this goal and you can help me get there.   So for 30 days I will be offering a bundle for each project I create.  This bundle will be products used in each post and the total will include shipping and tax (if applicable).   All you have to do is press the Paypal Button below the bundle to purchase yours.

TODAY'S  BUNDLE
includes:

Journey Circles Die Set
Uplift Die Set
Dandelion Wishes Stamp  Set
PLUS a free bloom benefit!!!

All for just $69.26 which includes shipping and tax (where applicable)


I hope you will give this bundle a try. It is a great opportunity to purchase and try out some of Fun Stampers Journey products.  Once you try them, I know you will be hooked!!

Please be sure to subscribe to my blog and sign up for my mailing list (mailing list is for non-fsj coaches only please).  I will send everyone on the mailing list, a free card making pdf every month!   Please be sure to send all your crafty friends over so they can sign up too!

I have listed the complete supply list below that links each item to my online store for purchase.  It can also be printed out by clicking the small "supply list" below the items.  I hope you enjoyed this card.  Thanks for stopping by and have an amazing day!

Jeanne
A Stroke of Jeanne-ius

Thursday, May 24, 2018

Lovely Lattice Card

Today I thought I would try something new, so after searching around on Pinterest, I found a lattice card which I thought was rather interesting, so I thought I would challenge myself to give it a try using my Fun Stampers Journey products to create it.  This is what I came up with!


I just love the light airy look of this card.  To start with, I created a base card of Whip Cream card stock.  I then used the Fancy Label Die of the size I wanted and die cut the front of the card.  This will leave an opening in the card.  Next, I took more Whip Cream card stock and cut several strips 1/4 inch wide to create the lattice look.  

With the card open, and working on the inside of the card begin by taping the card onto grid paper using repositionable tape.  Start creating the lattice by placing one of the 1/4" strips across the opening of the card and gluing into place using craft glue.  Continue placing each strip 1/2" apart until you have them all laid.  The grid paper makes this really easy!


Next you will start to place the strips that go in the opposite direction.  Choose the first strip and weave it under and over the first strips creating a basket weave look.  Glue the first strip in place.  Then continue to weave the remaining strips starting each one opposite of the last one, for example,  if you started the last one over the previous strip, start the next one under etc.  See photo below.  


Once completed, the front of your card should look like this.  (The back will have all the glued strips showing (see photo above).


The next thing I did was cut a piece of Pool Play card stock which was 5.5 x 4.25 inches and glued it to the inside front of the card to cover the glued lattice work.  Then it showed thru the front of the card, creating a lovely blue background behind the lattice.

Using the branch and flower stamps from the Birthday Melody stamp set, I stamped one branch and five small blossoms onto Whip Cream card stock using Black Licorice Ink.  I colored the pieces using Color Burst Pencils and fussy cut them out using my detail scissors.  I wanted them to resemble cherry blossoms. 

I arranged the branch along the left side of the lattice and popped up four of the five flowers using foam squares along the branch where I felt it would look good.  For the last small blossom, I cut it apart and added the small bud at the top of the branch and one of the other blossoms along the branch to fill it in.  (These were not popped up)

I chose one of the butterflies  and the sentiment from the Small Things Stamp set and stamped them both onto Whip Cream card stock using Black Licorice ink.  I colored the butterfly using Color Burst Pencils and die cut both using the matching dies.  The butterfly was glued to the upper right corner using craft glue.  I placed the sentiment across the lower portion of the lattice and glued it in place.  


This card has a really fresh, spring look to it and I really love the lattice affect.  It added the perfect touch to put this card over the top.  I hope you like it! 


Today is day 12 of my Make it to Manager Bundles. I need to reach  a certain sales amount to achieve this goal and you can help me get there.   So for 30 days I will be offering a bundle for each project I create.  This bundle will be products used in each post and the total will include shipping and tax (if applicable).   All you have to do is press the Paypal Button below the bundle to purchase yours.

TODAY'S  BUNDLE
includes:

Small Things Stamp Set
Small Things Die Set 
Bird Melody Stamp Set
Bird Melody Die Set 
PLUS a free bloom benefit!!!

All for just $98.86 which includes shipping and tax (where applicable)


I hope you will give this bundle a try. It is a great opportunity to purchase and try out some of Fun Stampers Journey products.  Once you try them, I know you will be hooked!!

Please be sure to subscribe to my blog and sign up for my mailing list (mailing list is for non-fsj coaches only please).  I will send everyone on the mailing list, a free card making pdf every month!   Please be sure to send all your crafty friends over so they can sign up too!

I have listed the complete supply list below that links each item to my online store for purchase.  It can also be printed out by clicking the small "supply list" below the items.  I hope you enjoyed this card.  Thanks for stopping by and have an amazing day!

Jeanne
A Stroke of Jeanne-ius

Wednesday, May 23, 2018

Pretty Tri-Fold Butterfly Card

I just love the butterfly papers in Fun Stampers Journey Sunday Adventure Prints.  They are so very colorful and can be used with so many different colors of paper.  Today I decided to use them to create this lovely tri-fold card.


The wonderful Small Things stamp set coordinates with this paper perfectly as does the Beach Breeze cardstock.

To create the base of this card, I started with Whip Cream Card stock and cut a piece 5.5 x 11.  This was then scored on the long side at 2.5" and again at 7.75".  Fold on the crease sides making the shorter end the front of your card.

I then cut a piece of  the butterfly printed paper from the Sunday Adventure Prints paper pack 2 3/8 inches wide and 5.25 inches tall.  I adhered it to the short front flap and centered it to create a colorful mat.  Beach Breeze card stock was then cut  to 4 x 5.25" and adhered to the second flap of the card.


Using Whip Cream Card stock and Black Licorice True Color Fusion ink, I stamped the sentiment and the butterfly from the Small Things Stamp Set onto the paper.  The butterfly was then colored using Color Burst colored pencils.  I trimmed the Whip Cream piece as shown making most of the piece rectangular and cutting out just the butterfly's wings.  This piece was then attached to a small strip of Beach Breeze card stock and then adhered to the front of the card as shown with part of the stamped piece hanging off the edge.  


The final touch was to add some Sparkle Silk to the butterfly wings.  I hope you like the finished product.  I really think it makes a great presentation and when you open the solid blue flap, there is plenty of room to write you message inside.

Today is day 11 of my Make it to Manager Bundles. I need to reach  a certain sales amount to achieve this goal and you can help me get there.   So for 30 days I will be offering a bundle for each project I create.  This bundle will be products used in each post and the total will include shipping and tax (if applicable).  Today's bundle features a chance to try out two of our most popular items along with this gorgeous stamp and die set!  All you have to do is press the Paypal Button below the bundle to purchase yours.

TODAY'S  BUNDLE
includes:

Small Things Stamp and Die Set
Sparkle Silk
Easy Glide Adhesive Tape Runner

All for just $57.43 which includes shipping and tax (where applicable)


I hope you will give this bundle a try. It is a great opportunity to purchase and try out some of Fun Stampers Journey products.  Once you try them, I know you will be hooked!!

Please be sure to subscribe to my blog and sign up for my mailing list (mailing list is for non-fsj coaches only please).  I will send everyone on the mailing list, a free card making pdf every month!   Please be sure to send all your crafty friends over so they can sign up too!

I have listed the complete supply list below that links each item to my online store for purchase.  It can also be printed out by clicking the small "supply list" below the items.  I hope you enjoyed this card.  Thanks for stopping by and have an amazing day!

Jeanne
A Stroke of Jeanne-ius

Tuesday, May 22, 2018

Easy Rose Easel Card

Fun  Stampers Journey has the perfect die for creating quick, easy and fun easel cards.  The Window Pop die can be used in many fun and imaginative ways.


I decided that I first wanted an inside to this card so I created a regular card base from Rich Coral card stock.  I then die cut some of the newspaper printed paper from the Romantic Journeys Paper pack using the Window Pop Die.  Once it was removed from the die, I folded the flap up  at the top to open the flap.  Then I brought the bottom of the flap down against the previous fold to create a tent shape that will stand up.  Here is how it looks when finished.  


I needed something to anchor, or hold the front of the flap in the upright position, so I cut another piece of Rich Coral and a small piece of Whip Cream and glued it behind the opening.  Then the die cut piece was adhered to the base card around the outer edges only.  

I stamped the gorgeous rose from the Dear Rose stamp set onto Whip Cream card stock using River Stone ink and colored it to coordinate with the Rich Coral Paper using Color Burst colored pencils   


It was then die cut using the matching die set and adhered to the flap on the lower portion below the second fold only.  This way the rose pops up and the flap supports it.  The Whip Cream and Rich Coral pieces act as a stopper which keeps the easel upright.  The sentiment was stamped in Rich Coral ink and die cut using the matching die. It was then attached under the flap on the stopper so that it shows when the flap is in it's easel position.  


For some added touches, I placed a thin strip of Rich Coral at the top fold of the Window Pop Die cut and placed a small Whip Cream thread bow on the upper left side.  I then adhered three of the orange Rainbow Drops for that little bit of bling.  

I hope you enjoy this card and will want to give this die a try.  I think you will like it!  

Today is day 10 of my Make it to Manager Bundles. I need to reach  a certain sales amount to achieve this goal and you can help me get there.   So for 30 days I will be offering a bundle for each project I create.  This bundle will be products used in each post and the total will include shipping and tax (if applicable).  All you have to do is press the Paypal Button below the bundle to purchase yours.

TODAY'S  BUNDLE
includes:

Window Pop Die
Dear Rose Stamp Set
Dear Rose Die Set 
Plus a free Bloom Benefit 

All for just $66.55 which includes shipping and tax (where applicable)


Be sure to subscribe to my blog and sign up for my mailing list (mailing list is for non-fsj coaches only please).  I will send everyone on the mailing list, a free card making pdf every month!   Please be sure to send all your crafty friends over so they can sign up too!

I have listed the complete supply list below that links each item to my online store for purchase.  It can also be printed out by clicking the small "supply list" below the items.  I hope you enjoyed this card.  Thanks for stopping by and have an amazing day!

Jeanne
A Stroke of Jeanne-ius

Website